
Why Spray Painting Eaves of House Transforms Your Home’s Protection and Curb Appeal
Spray painting eaves of house is one of the most effective ways to protect and refresh your home’s exterior. Here’s what you need to know to get started:
Quick Guide to Spray Painting Eaves:
- Prepare the surface – Clean, scrape loose paint, sand, and repair any damage
- Choose the right day – Paint when temperatures are 50-85°F with low humidity and minimal wind
- Use proper equipment – An airless paint sprayer with appropriate tips (313 or 413 for trim)
- Master the technique – Hold the sprayer 12 inches from the surface, overlap passes by 50%
- Apply multiple coats – Use one coat of primer and two coats of paint for best results
- Stay safe – Wear protective gear and follow ladder safety guidelines
Your eaves—the edges of your roof that overhang the exterior walls—consist of the fascia (vertical boards) and soffits (undersides). These components face constant assault from sun, rain, wind, and pests. A quality paint job using a sprayer can finish the work in a fraction of the time it takes with brushes or rollers, while delivering superior coverage and a smooth, professional finish.
As Tomasz Niemotko with over 13 years of experience at T&Z Interior And Exterior Painting, I’ve completed countless spray painting eaves of house projects throughout Lombard and surrounding areas, changing weathered exteriors into protected, beautiful homes. Our team specializes in achieving the meticulous finish that only comes from proper preparation and expert technique.
, Stage 2 - Mask (protect roof, windows, and siding with tape and plastic), Stage 3 - Spray (prime sprayer, maintain 12-inch distance, overlap passes 50%), Stage 4 - Clean (wash sprayer immediately, store properly), Stage 5 - Safety (wear respirator and goggles, use stable ladders, maintain three points of contact) - spray painting eaves of house infographic")
Spray painting eaves of house terms simplified:
Essential Preparation Before You Spray
Before we even think about pulling a trigger on a paint sprayer, proper preparation is the name of the game. We always say, a paint job is only as good as the prep work that goes into it. This is especially true when spray painting eaves of house, where every detail counts for that flawless finish.

For a successful exterior painting project, we gather a specific arsenal of tools and equipment. This includes:
- Airless paint sprayer: The star of our show for efficiency and a smooth finish.
- Paint: High-quality exterior paint.
- Primer: Essential for adhesion and coverage.
- Pressure washer: For deep cleaning.
- Scrapers and sanders: To remove loose paint and smooth surfaces.
- Exterior filler and caulk: For repairs and sealing gaps.
- Painter’s tape and plastic sheeting: Our best friends for masking.
- Drop cloths: To protect plants and pathways.
- Ladders or scaffolding: For safe access to those high eaves.
- Safety gear: Goggles, gloves, dust mask, and a spray sock or hat.
Choosing Your Materials and a Perfect Day
The right materials are paramount. We always opt for high-quality acrylic latex paint for exterior applications. Why acrylic latex? It offers superior durability, flexibility, and resistance to UV radiation and moisture, crucial for the harsh Illinois weather. It also handles the expansion and contraction of wood much better than older oil-based paints, preventing cracking and flaking over time.
For primer, we select an exterior primer that matches the surface. For previously painted surfaces or bare wood, an oil-based primer works wonders. If masonry is involved, a multi-surface primer is our go-to. For areas particularly prone to mold, we consider a mold-resistant primer as an extra layer of defense.
Now, let’s talk about timing. Choosing the perfect day for spray painting eaves of house is like picking the winning lottery numbers – it makes all the difference! We look for ideal weather conditions:
- Temperature range: Between 50-85°F (10-30°C). Extreme temperatures can affect paint drying and adhesion.
- Low humidity: High humidity slows down drying time, increasing the risk of drips and uneven coats.
- Minimal wind: This is absolutely critical for spray painting. Even a slight breeze can carry overspray to unintended areas (like your neighbor’s car!) and distort the spray pattern, leading to uneven coverage. We definitely avoid spraying when it’s windy to ensure a clean, professional application.
Preparing the Eaves Surface
Preparing the eaves surface is where the real work begins, but it’s also where we lay the foundation for a stunning, long-lasting finish.

Our first step is always thorough cleaning. We use a pressure washer to blast away dirt, grime, and loose paint from the entire exterior, including the eaves and soffits. For stubborn mold or mildew removal, we apply a solution of 1 cup of bleach and 1 cup of trisodium phosphate in 2 gallons of water, scrub it, and then rinse thoroughly. Remember to protect surrounding plants with drop cloths before using any cleaning solutions. After washing, we allow the surface to dry completely – usually one to two days.
Next, we move to surface repair. We carefully inspect the eaves for any imperfections. We use a scraper or wire brush to remove any remaining loose paint, then sand rough spots to create a smooth transition between painted and bare areas. Any rotted wood or siding is replaced, and we use exterior filler or epoxy to fill holes and cracks. We then caulk gaps around windows, doors, and where different materials meet, ensuring a tight seal against moisture.
A crucial consideration for older homes, especially those built before 1978, is the potential presence of lead paint. If we suspect lead paint, we advise our clients to have it tested before any scraping or sanding. If lead paint is confirmed, we follow strict EPA guidelines for lead-safe work practices to ensure safety for everyone involved and the environment. Your safety and the longevity of your home are our top priorities!
The Complete Guide to Spray Painting Eaves of House and Trim
With all the preparation carefully completed, we’re ready for the exciting part: the actual spray painting! This is where our expertise with the equipment and technique truly shines.
Before we start, we go through a thorough sprayer setup. This involves priming the sprayer according to the manufacturer’s instructions. Once primed, we perform a testing spray pattern on a large piece of cardboard or a less visible area. This helps us adjust the pressure and get comfortable with the sprayer’s feel and our speed, ensuring a consistent application.
Masking techniques are critical to prevent overspray. We protect anything we don’t want painted with extreme prejudice! This includes protecting the roof with plastic sheeting, carefully covering windows and doors, and shielding siding or brick that isn’t being painted. We use high-quality painter’s tape to secure the plastic and ensure crisp, clean lines. High-efficiency airless sprayers can reduce overspray by up to 55% compared to traditional airless sprayers, but masking is still essential for a professional finish.
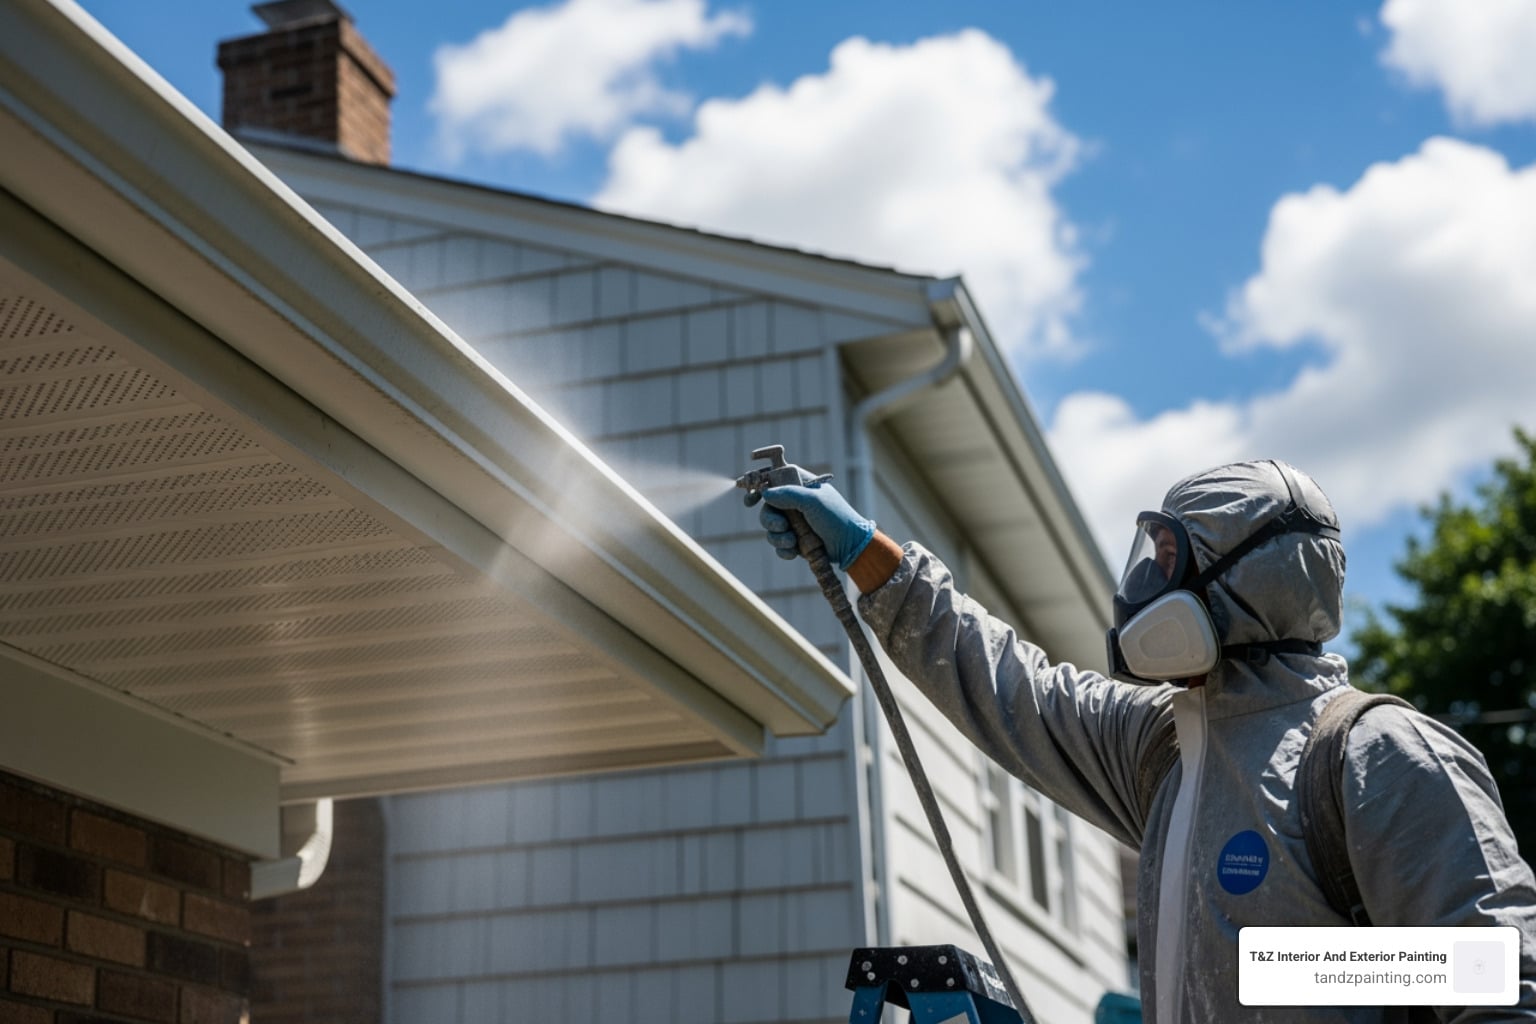
Proper Technique for Spray Painting Eaves of House
Mastering the technique for spray painting eaves of house is key to achieving that smooth, even finish we pride ourselves on.
First, we focus on choosing the right spray tip. For eaves and trim, we typically use a 313 or 413 spray tip. These tips provide a narrower spray pattern and lower flow, which is ideal for precise work on smaller, intricate areas like fascia and soffits. For larger, flat surfaces like siding, a 515 tip offers faster coverage.
When tackling high eaves, tip extensions are invaluable. They allow us to reach difficult areas safely from a ladder, maintaining the correct spraying angle and spraying distance. We always aim to hold the sprayer approximately 12 inches from the surface, keeping it perpendicular and moving our entire arm in a smooth, consistent motion. This distance is crucial for an even coat and to avoid drips.
We work systematically, maintaining a consistent motion and ensuring overlapping passes by approximately 50%. This means each new pass overlaps the previous one by about half, guaranteeing complete coverage without heavy spots or missed areas. We typically start by working in sections, beginning with the eaves or undersides of overhangs, then moving to fascia and soffits. For exposed trusses or wood beams, we spray in the direction of the wood grain for the best look. We always start our spray motion before pulling the trigger and release the trigger after each pass, preventing paint buildup at the start and end of our strokes.
Achieving a Smooth, Professional Finish
Our goal is always a smooth, professional finish, free from imperfections.
To achieve this, we focus on avoiding drips and runs. This comes down to consistent technique – maintaining the correct distance, speed, and overlap. However, sometimes, especially with the unpredictable Illinois weather, drips can occur. If we’re working on a particularly porous surface or a rough wood, we might employ a back-brushing technique or back-rolling technique immediately after spraying. This involves using a brush or roller to work the wet paint into the surface, ensuring better adhesion and penetration, and effectively eliminating small drips before they set. This is a crucial step that many DIYers might overlook, but it significantly improves the durability and appearance of the paint job.
Once the first coat is applied, we allow adequate drying time as recommended by the paint manufacturer. This is critical before applying a second coat. Rushing this step can lead to blistering or peeling later on. Generally, we aim for one coat of primer and two coats of paint for optimal coverage and longevity.
Finally, after the paint is completely dry, we carefully begin removing masking tape and plastic sheeting. Peeling the tape slowly and at a 45-degree angle helps achieve crisp, clean lines. This attention to detail is what separates a good paint job from a truly exceptional one. For more detailed insights into exterior spray painting, we often refer to comprehensive guides like the DIY Guide to Paint Sprayer for Exteriors | Magnum by Graco .
Troubleshooting and Aftercare
Even with the best preparation and technique, sometimes issues can arise. Knowing how to troubleshoot common problems and properly care for your equipment ensures a successful project and longevity of your tools.
After every job, sprayer maintenance is non-negotiable. Cleaning the paint sprayer immediately after use is paramount. We follow the manufacturer’s specific instructions, often using a Power Flush cleaning system for water-based paints or a simple bucket method. This prevents paint from drying inside the components, which can lead to clogs and damage. Once clean, proper storage of equipment in a dry, safe place ensures it’s ready for the next project.
Common Issues When Spray Painting Eaves of House and How to Fix Them
Here’s a quick list of common problems we’ve encountered when spray painting eaves of house and how we tackle them:
- Uneven coverage: This often happens due to inconsistent spraying speed, distance, or insufficient overlap. We address this by re-spraying the area, focusing on a steady hand and proper technique. If the paint has dried, light sanding and a fresh, even coat might be needed.
- Paint runs and sags: Usually caused by applying too much paint in one area or holding the sprayer too close. If the paint is still wet, we can sometimes back-brush or back-roll to smooth it out. If it has dried, we fix drips by sanding them smooth and then reapplying paint.
- Overspray issues: This occurs when paint drifts onto unintended surfaces. It’s why meticulous masking is so important! If overspray happens, we address it immediately while wet by wiping or gently scraping. If dry, it might require careful sanding or specialized cleaning, depending on the surface.
- Clogged spray tip: A common annoyance! This typically happens when paint isn’t strained properly or the sprayer hasn’t been cleaned thoroughly from a previous use. We clear clogs by reversing the tip (if it’s a reversible tip) or by disassembling and cleaning it according to the manual. Using a paint strainer bag is a great preventative measure.
- Fixing drips after drying: Don’t panic! Drips are cosmetic, and they can be fixed. Once the paint is completely dry, we use fine-grit sandpaper to gently sand down the drip until it’s flush with the surrounding surface. Then, we apply a small amount of fresh paint, carefully blending it with a brush or by light re-spraying for a seamless touch-up painting.
Key Safety Precautions for Exterior Painting
Safety is always at the forefront of our minds, especially when working at heights and with powerful equipment. Spray painting eaves of house demands respect for both the tools and your surroundings.
When working on any exterior painting project, we always prioritize Personal Protective Equipment (PPE). This includes:
- Dust mask or respirator: Crucial for protecting your lungs from paint fumes and fine paint particles.
- Goggles: To shield your eyes from paint spray and debris.
- Gloves: To protect your hands from paint and chemicals.
- Long sleeves, pants, and a hat or spray sock: To cover exposed skin and hair.
Ladder and scaffolding safety is non-negotiable. Many eaves are high up, requiring careful access. We always ensure our ladders are:
- On stable, level ground.
- Extended at least 3 feet above the support point.
- Used with caution, maintaining three points of contact (two hands and one foot, or two feet and one hand) at all times.
- Moved frequently rather than overreaching, which can lead to dangerous imbalances.
For extensive high work, scaffolding provides a much more stable and safer platform. We strictly adhere to OSHA ladder safety guidelines to protect ourselves and our team.
Beyond working at height, we are mindful of electrical hazards, turning off outdoor outlets and ensuring no wires are near our work area. Adequate ventilation is also important, even outdoors, to disperse fumes and ensure a comfortable working environment.
Conclusion
Spray painting eaves of house is a transformative home improvement project that offers significant benefits. We’ve seen how a fresh coat of paint not only improves curb appeal but also provides vital long-term protection against the elements and pests, ultimately contributing to improved home value. While the DIY satisfaction of tackling such a project is immense, it certainly requires meticulous preparation, the right tools, and a keen eye for detail and safety.
Whether you’re a seasoned DIY enthusiast or considering updating your home’s exterior for the first time, we hope this guide empowers you with the knowledge to achieve a beautiful and durable finish. For a guaranteed professional finish without the hassle, consider the experienced team at T&Z Interior And Exterior Painting. We pride ourselves on delivering quality, stunning results through our experienced teams, top-brand materials, and excellent customer service. Learn more about our professional spray painting services.