
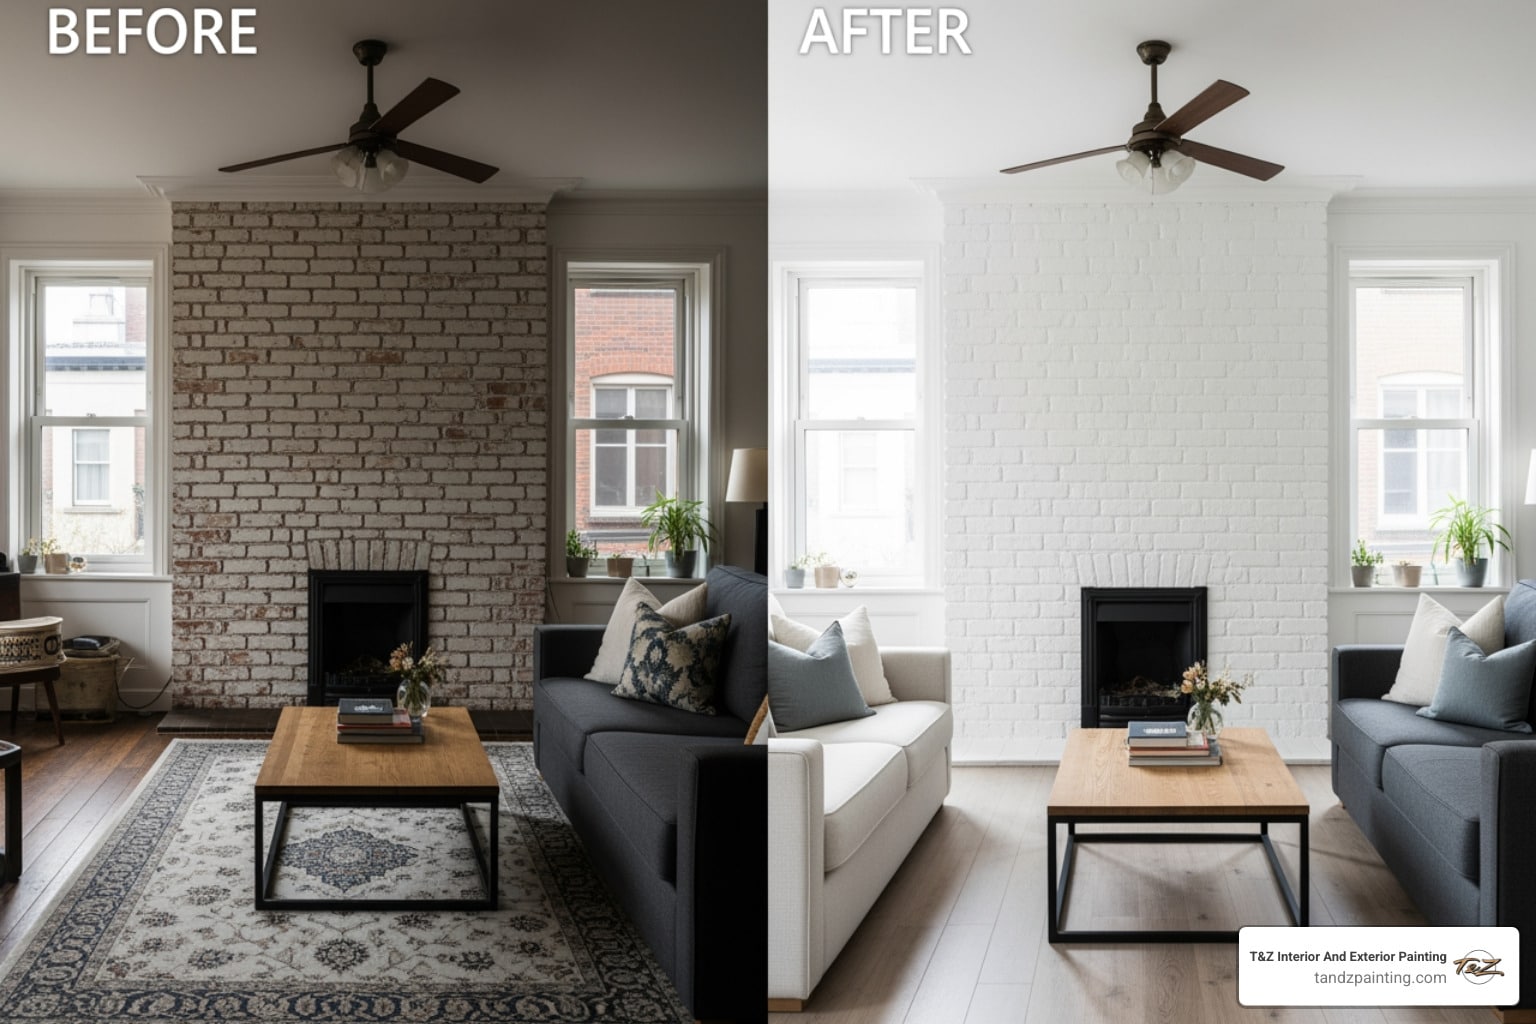
Why Painting Interior Brick Walls Can Transform Your Home
Painting interior brick walls is one of the most dramatic — and permanent — upgrades you can make to a room. Done right, it turns a dated, dark feature wall into a clean, modern focal point.
Here’s a quick overview of the process:
- Clean the brick thoroughly with a stiff brush and soap-and-water solution
- Dry the surface for 24-48 hours (or longer if wet-cleaned)
- Prime with a masonry-specific, stain-blocking primer
- Paint using a high-nap roller and angle brush for mortar lines
- Apply a second coat after the first has fully dried
Important: Because brick is highly porous, paint soaks in permanently. This is not a reversible project — so choose your color carefully before you begin.
Exposed brick has real character. It can anchor a living room, warm up a dining space, or give a fireplace serious curb appeal inside your home. But when that brick starts to feel outdated — think dark orange tones from the 1970s or 80s — a fresh coat of paint can completely modernize the space without a costly renovation.
The catch? Brick behaves very differently from drywall. It’s porous, it can hold moisture, and it has uneven texture that makes painting more involved than a standard wall job. Getting it right means understanding the material first.
I’m Tomasz Niemotko, owner of T&Z Interior And Exterior Painting, with over 13 years of experience tackling everything from accent walls to full-room transformations — including painting interior brick walls in homes across the Lombard area. In the sections below, I’ll walk you through exactly how to do this project the right way.

Should You Paint Your Interior Brick?
Before you crack open a can of paint, it is vital to ask: Is this the right move for your home? At T&Z Interior And Exterior Painting, we often see homeowners in Elmhurst or Downers Grove torn between keeping the “natural” look and going for a modern white or gray.
Brick is a unique substrate. Unlike drywall, it “breathes.” It is naturally porous, meaning it can absorb and release moisture. When we talk about painting interior brick walls, we are essentially sealing those pores. This can be great for dust suppression—no more red dust on your baseboards—but it also means any moisture trapped inside has nowhere to go.
Comparing Your Options
If you aren’t sure about a solid paint job, consider the alternatives. Staining or whitewashing can offer a middle ground.
| Feature | Solid Paint | Whitewash | Brick Stain |
|---|---|---|---|
| Appearance | Uniform, opaque color | Translucent, “aged” look | Natural texture, color change |
| Breathability | Low (seals surface) | High | High |
| Maintenance | Easy to wipe clean | Moderate | Low |
| Reversibility | Nearly impossible | Difficult | Permanent |
| Best For | Modernizing dated brick | Rustic or French Country | Changing tone while keeping feel |
One common issue with masonry is efflorescence. This is that white, powdery salt deposit that sometimes appears on the surface. It’s caused by moisture carrying salts through the brick. If you paint over active efflorescence without fixing the moisture source, the paint will peel. We always recommend an alkaline-resistant primer to help neutralize the surface and ensure the House Painting project lasts for years.
On the plus side, painting interior brick walls significantly increases light reflection. Dark, porous brick absorbs light like a sponge. A white or light gray painted wall can make a basement or a sunroom in Wheaton feel twice as bright.
Preparation and Materials
Preparation is 90% of the work when it comes to masonry. You cannot simply start rolling paint onto a dusty brick wall and expect it to stick. Brick is a magnet for dust, soot (if it’s a fireplace), and cobwebs.

The Cleaning Process
First, we start with a thorough vacuuming using a brush attachment to get into the deep crevices of the mortar. Next, use a stiff wire brush or a natural stiff-bristled brush to scrub away loose mortar and debris.
For cleaning solutions, a simple mix of dish soap and water often works for general dust. If you are dealing with a fireplace in Naperville that has heavy soot stains, you might need a vinegar solution or even Trisodium Phosphate (TSP). When using TSP, always wear gloves and goggles, and ensure the room is well-ventilated.
Crucial Timing: After cleaning with any liquid, you must let the brick dry for at least 24 to 48 hours. Brick holds onto water. If you paint over damp brick, the moisture will eventually push the paint off the surface in the form of bubbles. For new constructions in areas like Plainfield, we recommend waiting one full year for new brick to acclimate and at least one month for new mortar to cure before even thinking about paint.
Essential Materials for painting interior brick walls
To get professional results, you need the right painting tools. Don’t settle for standard equipment used for smooth walls.
- Acrylic Latex Paint: This is the standard for interior brick. It’s flexible and durable.
- Masonry Primer: A high-quality, “high-hiding” primer is non-negotiable. It blocks stains and provides a “bridge” for the paint to stick to the porous surface.
- High-Nap Roller: Look for a 1/2-inch to 1-inch nap. The thicker the nap, the better it can push paint into the “nooks and crannies” of the brick texture.
- Angle-Sash Brush: Essential for “cutting in” the mortar lines where a roller can’t reach.
- Acrylic Caulk: Used to fill small cracks or gaps that become more visible after the primer is applied.
- Drop Cloths and Painter’s Tape: Brick painting is messy; you’ll want to protect your floors and trim.
Step-by-Step Guide to painting interior brick walls
Ready to begin? Follow these steps to ensure your project looks like it was done by the pros at T&Z Interior And Exterior Painting.
1. Protect and Tape
Start by moving all furniture away from the wall. Lay down heavy-duty drop cloths. Use painter’s tape to mask off the ceiling, floor, and any adjacent walls. Because brick is uneven, the tape might not seal perfectly. Pro tip: use a tiny bit of caulk or a “dry” brush to seal the edge of the tape to prevent bleed-through.
2. The Priming Phase
Apply your masonry primer. Start by using your angle brush to “cut in” the mortar lines and the edges of the wall. Once the deep spots are filled, use your high-nap roller for the flat surfaces of the brick. Rolling from the top down helps you catch any drips before they dry.
3. Repairing Imperfections
Once the primer is dry, you might notice cracks or gouges you didn’t see before. This is the time to use acrylic caulk to fill those gaps. This ensures a seamless, high-end look, much like the projects in our Portfolio: Interior Painting Naperville.
4. Applying the First Coat
After the primer and caulk are fully set, apply your first coat of acrylic latex paint. Again, start with the brush in the mortar joints and follow with the roller. Don’t try to get 100% coverage in one go—two thin coats are always better than one thick, drippy coat.
5. The Second Coat and Finish
Wait the recommended time on the paint can (usually 4–6 hours) before applying the second coat. This second pass will fill in any “pinholes” where the brick absorbed the first coat. Remove your painter’s tape while the second coat is still slightly tacky to get the cleanest lines possible.
Common Mistakes when painting interior brick walls
We’ve seen it all in the Chicagoland area, and most “failed” brick jobs come down to a few avoidable errors:
- Painting Damp Brick: This is the number one cause of peeling.
- Skipping Primer: Without primer, the brick will suck the moisture out of the paint, leaving it chalky and prone to flaking.
- Using Oil-Based Paint: Oil-based paints don’t breathe. They trap moisture inside the brick, which can lead to structural damage over time.
- Ignoring Efflorescence: If you see white powder, you must clean it and use a specialized primer, or it will push through your new paint.
Design Styles and Special Considerations
Painting interior brick walls isn’t just about a solid white wall. There are several ways to play with texture and light to create a specific vibe.
Fireplace Safety
If you are painting a fireplace, there are safety rules to follow. While the exterior brick can be painted with standard latex, the inside (the firebox) requires specialized high-heat paint. Never use standard house paint inside where the actual flames touch. Also, if you have a mantel, you’ll need to decide whether to paint it to match or keep it as a wood accent for contrast.
Flat vs. Gloss Finishes
The finish you choose changes the room’s feel entirely.
- Flat/Matte: This is the most traditional look. It hides imperfections and gives that classic “lofty” feel. However, it is harder to clean.
- Semi-Gloss or Gloss: These are much easier to wipe down, making them great for kitchens or high-traffic hallways. They reflect more light but will highlight every bump and crack in the brick.
Achieving Different Looks when painting interior brick walls
If a solid color feels too “heavy,” try these techniques:
- Whitewash: Mix 50% white latex paint with 50% water. Brush it on and immediately blot it with a rag. This allows some of the natural brick color to peek through, creating a soft, vintage look.
- Antiquing with Primer: Some homeowners love the look of a “sloppy” primer coat. By applying primer haphazardly and not covering every crevice, you can mimic the look of centuries-old efflorescence and aged masonry.
- German Schmear: This involves using wet mortar or heavy plaster over the brick to create a thick, textured, white-washed appearance common in old European cottages.
Whether you want a sleek modern look or a rustic Painting effect, the key is consistency across the entire surface.
Frequently Asked Questions about Masonry
Frequently Asked Questions about painting interior brick walls
Is it better to use “Masonry Paint” or standard Latex? For interior walls that aren’t exposed to the elements, a high-quality acrylic latex paint is usually sufficient and offers more color choices. However, for basements or areas with higher humidity, a specialized masonry paint with mold and mildew resistance is a safer bet.
How do I prevent the paint from looking “soaked in”? This is where the primer earns its keep. Brick is like a sponge. The primer fills those microscopic holes so the topcoat of paint sits on the surface rather than disappearing into the brick.
Can I paint over previously painted brick? Yes, but you must scrape off any peeling paint first. If the old paint is oil-based, you will need a transition primer before applying a water-based latex topcoat.
Is painting interior brick reversible?
In a word: No. Because of the extreme porosity of brick, the paint doesn’t just sit on top—it soaks into the pores. While there are chemical strippers and sandblasting methods, they are incredibly messy, expensive, and can permanently damage the face of the brick. If you are Interior Painting a brick wall, you should consider it a permanent change.
What paint finish works best for brick?
We generally recommend a Flat or Eggshell finish for a classic, sophisticated look. Flat paint hides the “busy” texture of the brick and mortar. However, if the wall is in a kitchen or a mudroom in Lombard, a Satin or Semi-gloss finish is much more practical for scrubbing away stains and fingerprints.
Conclusion
Painting interior brick walls is a fantastic way to breathe new life into a room, provided you respect the material and put in the prep work. From choosing the right high-nap roller to allowing for proper drying times, every step is vital to a result that won’t peel or flake.
At T&Z Interior And Exterior Painting, we pride ourselves on delivering stunning, quality results for our neighbors in Lombard, Glenview, Elmhurst, and across the Chicagoland area. We use only top-brand materials and experienced teams to ensure your home transformation is handled with care.
If you’re ready to turn that dated brick fireplace or accent wall into a masterpiece but don’t want to deal with the mess of TSP and heavy rollers, we are here to help.
More info about interior painting services
Contact us today for a professional consultation, and let’s get started on making your home look its absolute best!