
Get a Smooth, Durable Finish With Interior Trim Spray Paint
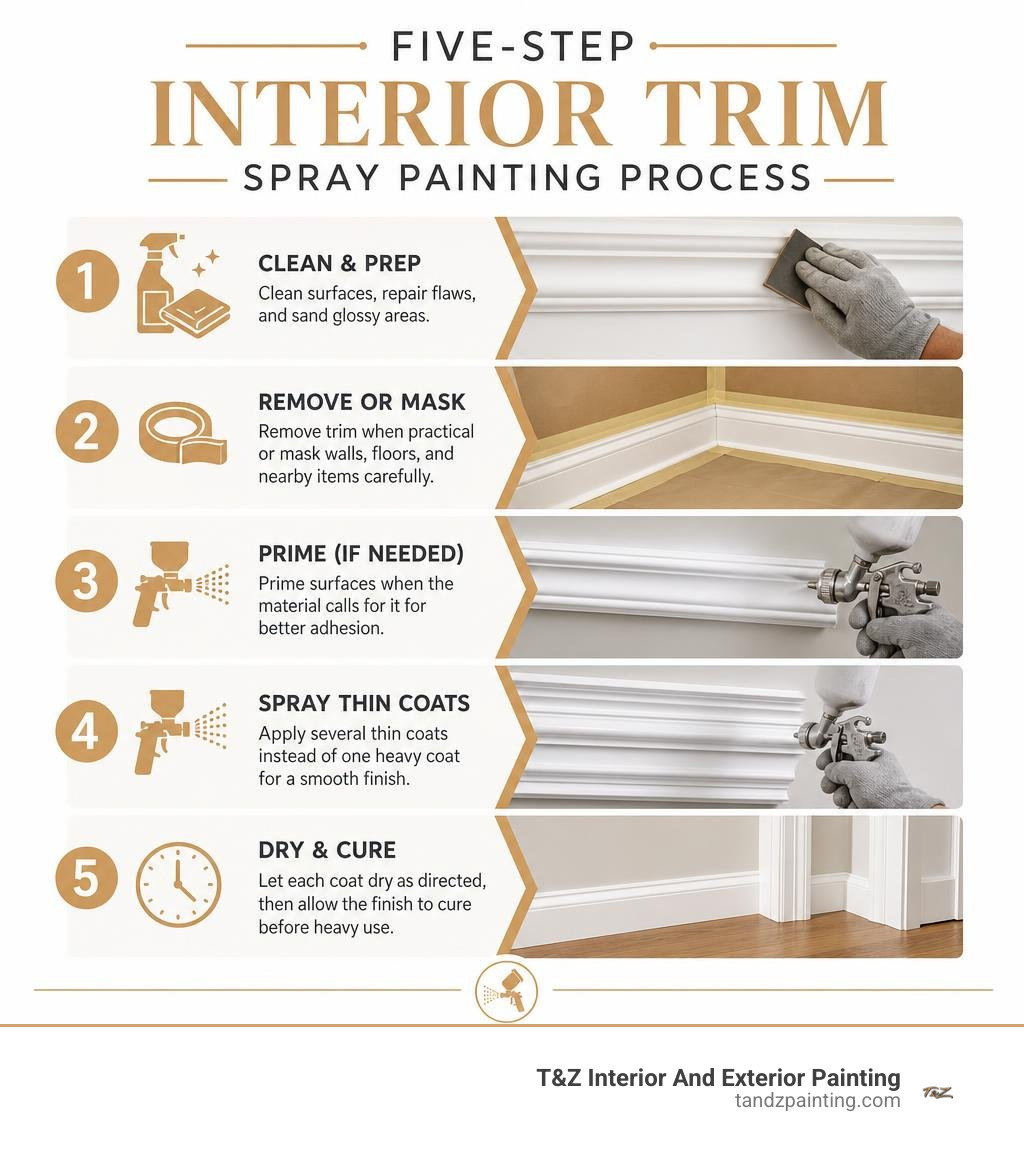
Interior trim spray paint can give baseboards, door casings, crown molding, and decorative trim a smooth, brush-mark-free finish when you use the right coating and prep the surface well. For the best result, clean the trim, repair flaws, lightly sand glossy areas, prime when the material calls for it, then spray several thin coats instead of one heavy coat.
- Choose paint made for the trim material, such as wood, MDF, PVC, plastic, or vinyl.
- Remove trim for easier spraying when practical, or carefully mask walls, floors, and nearby furniture.
- Use satin or semi-gloss for most home trim because it balances cleanability with controlled shine.
- Let each coat dry according to the product label, then allow the finish to cure before heavy use.
Aerosol cans work well for small repairs and removable pieces. For a full room of installed trim, a fine-finish paint sprayer and quality trim enamel usually provide more even coverage and better control. Proper surface prep matters most: paint will not reliably bond to dust, grease, slick gloss, or loose old paint.
I am Tomasz Niemotko, and through more than 15 years of licensed and insured painting work at T&Z Interior And Exterior Painting, I have helped homeowners achieve clean, durable results with Interior trim spray paint and professional spray applications. Our team serves Lombard, Itasca, Addison, Glen Ellyn, Oak Brook, and surrounding towns, with a 5.0 Google Reviews rating built on careful craftsmanship and reliable service.
Common Interior trim spray paint vocab:
Choosing the Right Interior Trim Spray Paint and Sheen
Achieving a high-end, factory-smooth surface begins with selecting the correct chemistry and sheen for your specific moulding. Not all trim surfaces respond the same way to standard aerosol or fine-finish coatings. Bare wood, primed medium-density fiberboard (MDF), rigid plastics, and cellular PVC all interact differently with paint resins and solvent carriers.
Understanding what sheen is best for trim paint helps balance aesthetic elegance with day-to-day durability. While high-traffic baseboards require washability, interior accent mouldings often look best with softer light distribution. Multi-surface products like GLIDDEN MAX FLEX 12 oz. Matte White Spray Paint and Primer dry to the touch in as little as 5 minutes on interior surfaces, making quick work of smaller accent pieces.
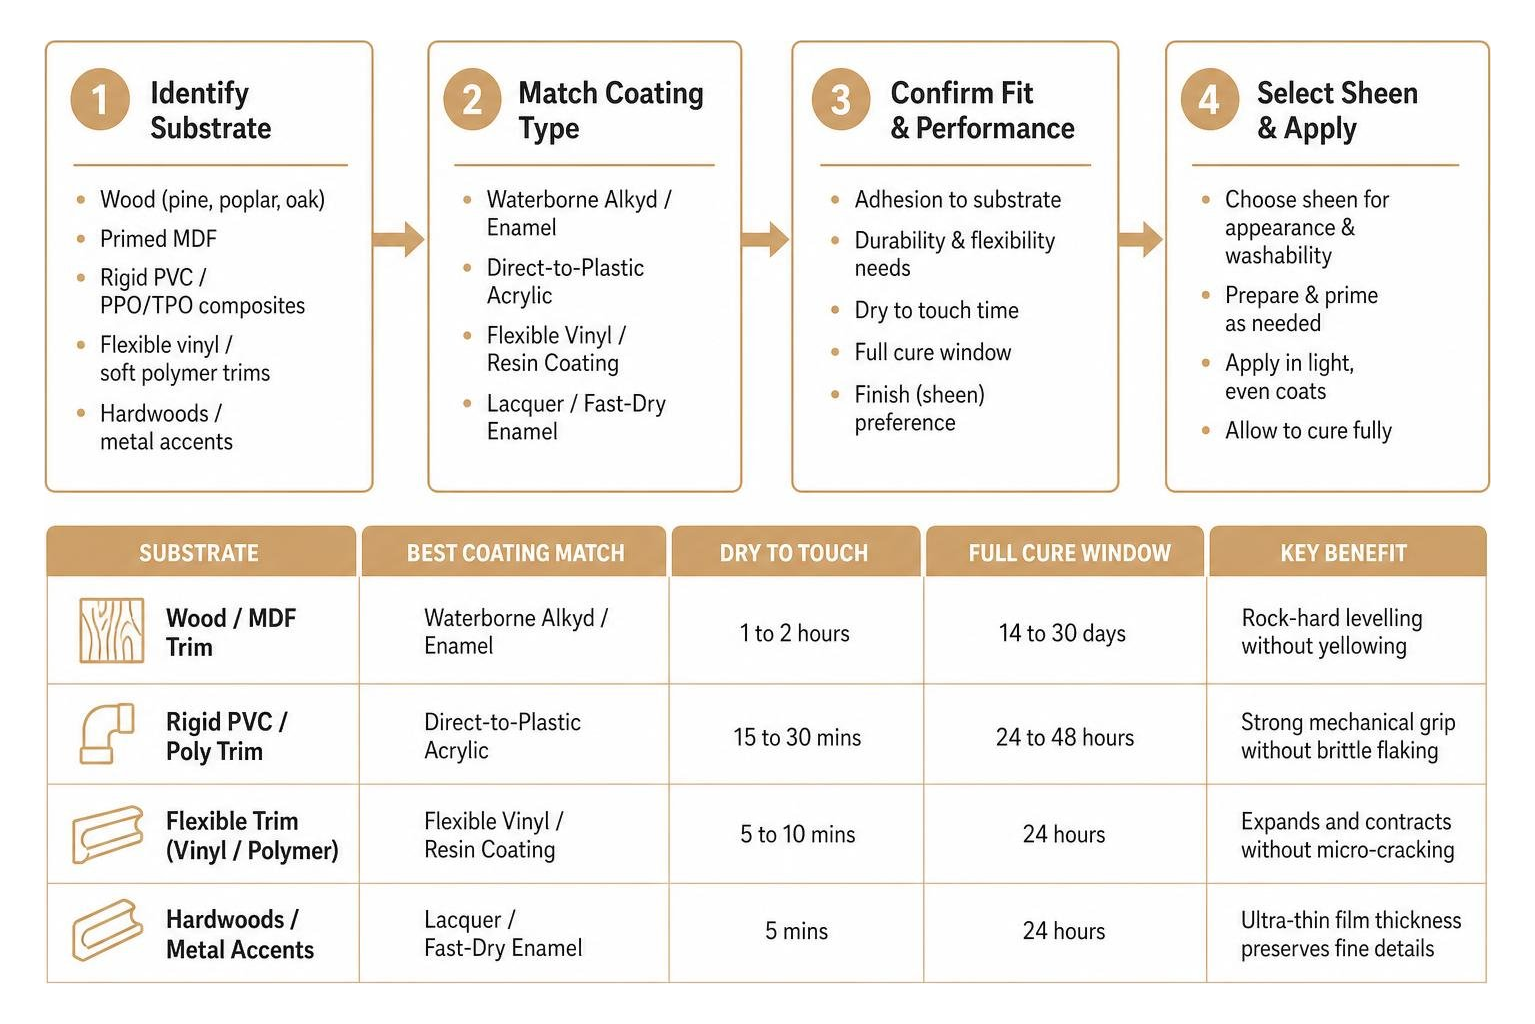
| Coating Type | Best Trim Materials | Dry to Touch | Full Cure Window | Key Benefit |
|---|---|---|---|---|
| Waterborne Alkyd / Enamel | Pine, Poplar, Oak, Primed MDF | 1 to 2 hours | 14 to 30 days | Rock-hard levelling without yellowing |
| Direct-to-Plastic Acrylic | Rigid PVC, PPO/TPO composites | 15 to 30 mins | 24 to 48 hours | Strong mechanical grip without brittle flaking |
| Flexible Vinyl / Resin Coating | Flexible vinyl, soft polymer trims | 5 to 10 mins | 24 hours | Expands and contracts without micro-cracking |
| Lacquer / Fast-Dry Enamel | Hardwoods, metallic accent trims | 5 mins | 24 hours | Ultra-thin film thickness preserves fine details |
Top Interior Trim Spray Paint Formulations for Different Materials
When choosing coatings for distinctive trim materials throughout a home, selecting high quality paints formulated specifically for the substrate is essential. Wood moulding and architectural MDF perform best under waterborne alkyd or acrylic-urethane enamels, which lay down flat and resist blocking.
For modern synthetic trims, cellular PVC, and flexible decorative pieces, standard wall paints will eventually peel under seasonal expansion. Specialty coatings like Seymour Semi-Gloss Black PBE Flexible Trim Paint use flexible acrylic resin technology capable of withstanding thermal movement and temperatures up to 250°F without delaminating. For automotive or specialty polymer applications, molecular bonding sprays such as ColorBond LVP Universal chemically fuse to substrates, setting to the touch in 45 seconds and curing within 10 minutes to preserve original textures.
Preventing Glare and Matching Factory Sheens
The sheen you choose dictates both room lighting dynamics and visual perfection. In our detailed paint sheens guide, we explain how light bounce reveals surface texture. Semi-gloss enamels, such as BEHR ULTRA Semi-Gloss Enamel, remain standard for residential baseboards and door frames because their tighter resin structure withstands regular scuffing and washing.
However, on wide upper mouldings, window headers, or custom vehicle interior dash bezels, excessive gloss creates harsh reflections and annoying glare. To prevent light bounce while matching original factory finishes:
- Matte / Flat Sheens: Ideal for ceiling transitions and upper decorative bands where glare from recessed lighting or sunlight can wash out architectural lines.
- Satin Sheens: The sweet spot for contemporary woodwork, offering a soft pearl luster that hides subtle wood grain variations.
- Metallic Accents: When highlighting architectural details or metal hardware, BEHR PREMIUM Metallic Spray Paint delivers a clean, plated metal aesthetic from roughly 12 inches away, covering 10 to 15 square feet per can.
- OEM-Matching Aerosols: Coatings like SEM Satin Black provide an authentic low-reflection factory look that resists temperatures up to 250°F across metal, plastic, and composite substrates.
Preparing Trim: Sanding, Priming, and Adhesion Promoters
Flawless spray painting depends almost entirely on the quality of your prep work. Atomized paint particles settle into an ultra-thin layer that mirrors every microscopic flaw, scratch, or particle of dust underneath. Taking time to properly level and decontaminate the substrate ensures that your final topcoat bonds permanently.
When preparing older woodwork or transitioning glossy factory finishes, follow our proven strategies to stop scuffing trim and baseboards by creating physical grip:
- Degrease Completely: Household oils, furniture polish, and finger grease ruin paint adhesion. Clean thoroughly with an aqueous non-solvent cleaner or wax-and-grease remover.
- Scuff Sand with Precision: Use 220-grit sandpaper for bare or primed wood. For slick plastics, vinyl, or factory lacquers, scuff with 400- to 600-grit abrasive paper. This creates micro-grooves for mechanical adhesion without leaving visible scratch lines.
- Combat Plasticizer Outgassing: Synthetic trim pieces, dashboards, and PVC profiles contain plasticizers that release chemical vapor in warm environments. Using dedicated bonding agents or self-priming formulations like Dupli-Color Vinyl & Fabric Coating locks outgassing beneath the finish so the paint will not soften or bubble.
- Targeted Priming: Apply a sandable bonding primer or self-etching primer over bare metals, knotty pine, and raw composite materials to block stain bleed-through and guarantee topcoat uniformity.
How to Spray Paint Interior Trim in 5 Steps
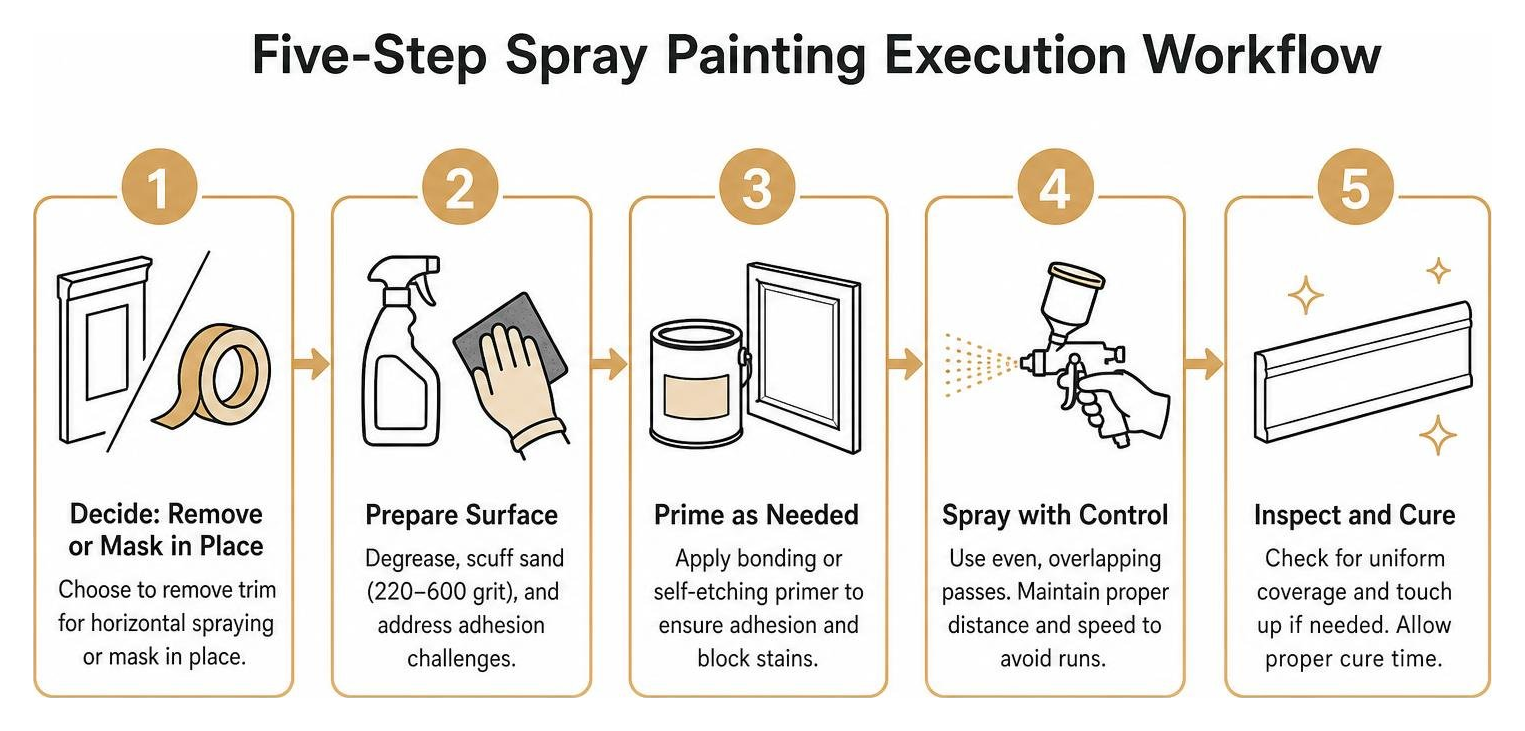
Whether tackling extensive baseboard runs or intricate crown molding painting, executing a clean spray finish requires systematic technique. When we perform whole-house spray painting house interior projects, we follow a strict five-step workflow designed to eliminate overspray, eliminate runs, and guarantee a factory-grade finish.
Step 1: Decide Whether to Remove or Mask in Place
Before picking up a sprayer or aerosol can, determine whether to spray the pieces horizontally in a controlled staging zone or mask them in place.
- Removing Trim: Ideal for quarter-round, uninstalled baseboards, and removable automotive panels. Laying trim horizontally across sawhorses lets gravity level the wet paint film naturally, minimizing runs and eliminating indoor overspray risks.
- Masking in Place: Essential for fixed baseboards, built-in cabinetry transitions, and architectural casing. When working on door trim painting, mask surrounding drywall with 12- to 18-inch painter’s paper, cover flooring with heavy drop cloths, and seal adjacent openings with static plastic sheeting.
Step 2: Clean, Repair, and Scuff-Sand the Surface
Fill all nail holes, gouges, and miter seam gaps with quality wood filler or sandable wood putty. A heat gun can quickly accelerate putty drying times on deeper repairs.
Once dry, sand the patched areas flush using 220-grit paper. Wipe all trim lengths down with a damp lint-free microfiber cloth or tack cloth to pull every speck of sanding dust out of the profiles. Finally, apply a flexible latex painter’s caulk along all wall-to-trim interfaces to seal shadow lines.
Step 3: Apply Adhesion Promoter or Primer
For raw wood, patchy repairs, or rigid plastics like PPO and TPO, apply your base adhesion layer:
- For rigid plastics, mist a light pass of clear adhesion promoter and let it flash for 5 to 10 minutes.
- For wood and MDF, apply an even coat of stain-blocking bonding primer.
- Allow the primer to dry completely, then perform a light scuff with 320-grit paper to knock down raised wood grain or dust nibs before blowing the surface clean.
Step 4: How to Apply Interior Trim Spray Paint Without Runs or Streaks
Proper spray gun or aerosol control separates amateur work from a mirror-smooth finish. Our experienced crews apply these core spraying mechanics, as detailed in our spray painting services guide:
- Maintain Consistent Distance: Keep your spray tip or aerosol nozzle roughly 6 to 12 inches away from the trim face throughout the stroke.
- Keep Parallel Movement: Never swing your wrist in an arc. Sweep your entire arm parallel to the trim profile to maintain an even coat thickness from start to finish.
- Overlap Each Pass: Maintain a consistent 50% overlap on every consecutive stroke to avoid light bands or dry spray textures.
- Apply Multiple Thin Coats: Spray 2 to 3 thin coats rather than one thick pass. Heavy single coats inevitably result in drips, sags, and prolonged solvent entrapment.
- Respect Recoat Windows: Follow product recoat guidelines closely. Many rapid-dry aerosols, like Seymour Spruce Metallic (covering up to 15 square feet per 12-oz can), are dry to the touch in 5 minutes and ready for recoat within 20 minutes. Standard aerosols typically need recoats within 1 hour or after a full 24-hour cure to prevent wrinkling.
Step 5: Clear Coat, Tape Removal, and Curing
If your trim will experience heavy physical contact, high sun exposure, or moisture, apply 1 to 2 light coats of a non-yellowing UV-resistant satin or matte clear coat.
Crucial Step: Remove masking tape while the topcoat is still slightly wet or tacky—typically 10 to 15 minutes after the final pass. If the paint dries completely over the tape edge, pulling the tape can tear the paint film away from the trim. Pull the tape smoothly back at a 45-degree angle. Allow the freshly sprayed trim to cure undisturbed for 24 to 48 hours before subjecting it to heavy cleaning or foot traffic.
Troubleshooting Common Trim Spraying Mistakes
Even experienced painters occasionally encounter application challenges when spraying detailed profiles. Knowing how to quickly correct these issues ensures your project stays on track for a clean finish.
- Runs, Drips, and Sags: Usually caused by spraying too close, moving too slowly, or applying coats too thick. If a run occurs while wet, avoid wiping it with your fingers, as this creates an unsightly smear. Allow the run to dry completely, block-sand it flat with 320-grit wet sandpaper, wipe clean, and re-spray a light coat.
- Orange Peel Texture: Happens when the paint dries before leveling, often due to high temperatures, low humidity, or holding the nozzle too far away. Sand the textured area smooth with 400-grit paper and apply a lighter, closer pass.
- Clogged Spray Nozzles: Dried paint can quickly plug fine-finish spray tips and aerosol nozzles. Prevent clogs by turning aerosol cans upside down after each session and spraying for 2 seconds until clear propellant emerges. For stubborn clogs, soak the removable plastic tip in mineral spirits or lacquer thinner.
- Spot Touch-Ups: To touch up minor finish nail holes without re-masking an entire room, spray your trim paint directly onto a paper cup or palette. Use a fine artist brush or Q-tip to dab the paint precisely onto the filled hole for an invisible repair.
Frequently Asked Questions About Interior Trim Spraying
How long does spray paint take to dry on interior trim?
Drying times depend on coating chemistry, temperature, and ambient humidity. Rapid-dry aerosol formulas like Seymour PBE Flexible Trim dry to the touch in 5 minutes and accept topcoats in 15 minutes, while ColorBond LVP sets in 45 seconds. Waterborne architectural trim enamels sprayed through professional equipment typically feel dry in 1 to 2 hours. However, full chemical curing—where the paint reaches its maximum hardness and scuff resistance—takes anywhere from 7 to 30 days.
Can you spray paint over existing paint or dye without stripping?
Yes, provided the underlying coating is structurally sound, clean, and well-adhered. Clean the surface thoroughly with a wax-and-grease remover and scuff sand with 320- to 400-grit sandpaper to remove surface sheen. Always conduct a small compatibility test in an inconspicuous area: apply a small mist of your spray paint and wait 15 minutes. If no bubbling, lifting, or wrinkling occurs, your new coating is chemically compatible.
Do I need a clear coat over painted interior trim?
A clear coat is not mandatory if you use high-grade enamel or molecular-bonding trim paint with built-in durability resins. However, applying 1 to 2 coats of a UV-resistant satin or matte clear coat adds an extra layer of protection on high-wear surfaces like window sills, door jambs, and vehicle interior panels exposed to direct sunlight and frequent handling.
Conclusion
Spraying interior trim transforms baseboards, door frames, and crown moulding by creating an ultra-smooth finish that brushed paint simply cannot match. With thoughtful prep work, the right primer, and controlled spray passes, you can achieve durable, professional-quality results that elevate the beauty of your living space.
For homeowners seeking flawless, stress-free transformations, T&Z Interior And Exterior Painting brings over 15 years of dedicated experience to every project. We are fully licensed and insured, holding a pristine 5.0 Google Reviews rating built on outstanding craftsmanship, meticulous masking, and reliable service.
Whether you are updating architectural millwork, refreshing door casings, or planning a whole-home interior update, our skilled team is ready to help. We proudly serve homeowners across Lombard, Itasca, Addison, Glen Ellyn, Oak Brook, and surrounding communities.
Explore our professional spray painting services today to discover how our experienced craftsmen can deliver lasting, stunning finishes throughout your home.