
Restaining vs. Painting: Choosing the Best Way to Restain Kitchen Cabinets
The best way to restain kitchen cabinets starts with thorough cleaning, light scuff sanding, and applying a gel stain or tinted polyurethane in thin, even coats — no full stripping required in most cases.
Here’s a quick overview of the process:
- Remove all cabinet doors, drawers, and hardware
- Clean and degrease surfaces thoroughly with TSP or a strong degreaser
- Lightly sand with 220-grit sandpaper to improve adhesion
- Apply gel stain or PolyShades in thin coats, following the wood grain
- Let dry 24 hours between coats, then buff lightly
- Reassemble once fully cured
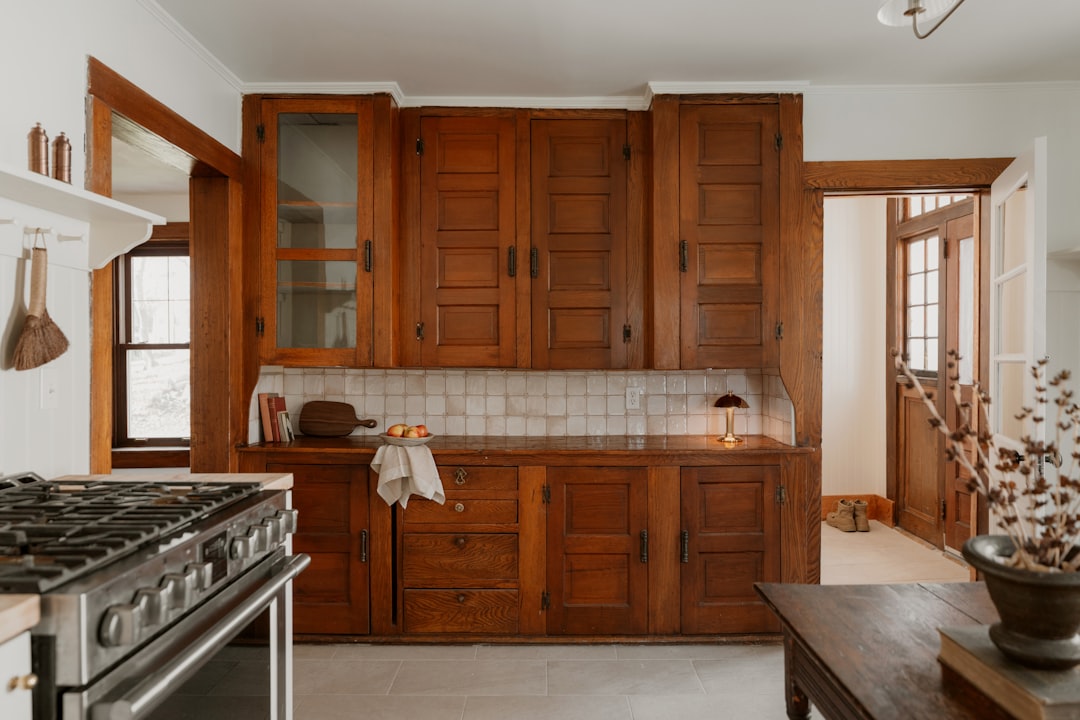
Your kitchen cabinets take a beating every day — heat, grease, moisture, and constant use all leave their mark. Over time, even solid wood cabinets start looking dull, dated, or just plain tired. But replacing them? That can cost tens of thousands of dollars. Restaining is one of the most effective ways to bring them back to life while keeping the natural wood beauty intact.
Whether your oak cabinets have gone too orange, your finish has faded, or you just want a richer, more modern tone, restaining gives you a dramatic result without a full kitchen renovation. The key is doing it right — with proper prep, the correct products, and a technique that delivers a smooth, professional finish.
I’m Tomasz Niemotko, owner of T&Z Interior And Exterior Painting, with over 15 years of hands-on experience in cabinet refinishing and painting across Lombard, IL and surrounding areas — and I’ve seen how the best way to restain kitchen cabinets can completely transform a home. In the sections below, I’ll walk you through exactly how to get professional-quality results, whether you’re doing it yourself or deciding when to call in the pros.

When your kitchen needs a refresh in April 2026, you generally face a crossroads: restain, repaint, or replace. Each path has its own merits, but for many homeowners in the Chicago suburbs, restaining is the gold standard for preserving the natural warmth of wood.
Restaining involves applying a pigment that penetrates or sits on the wood surface to enhance the grain. In contrast, painting creates an opaque, solid layer that completely hides the wood’s texture. If you have high-quality wood like cherry, maple, or walnut, restaining is often the preferred choice to showcase that investment.
| Feature | Restaining | Painting | Replacement |
|---|---|---|---|
| Appearance | Highlights wood grain | Solid, uniform color | Brand new look |
| Durability | Very high (absorbs into wood) | High (surface layer) | Depends on quality |
| Hides Flaws | No (shows grain/imperfections) | Yes (covers wood defects) | N/A |
| Timeline | 3–7 days | 3–5 days | Weeks of construction |
If you find yourself asking, Kitchen Cabinet Painting Is It A Good Idea, the answer depends on your aesthetic goals. Painting is fantastic for a modern, “pop” of color, but restaining is the timeless choice. For those in areas like Elmhurst, IL, Cabinet Painting Elmhurst Il is a popular request, but we often find that homeowners with beautiful red oak or white oak prefer the classic look of a fresh stain.
Determining the Best Way to Restain Kitchen Cabinets for Your Wood Type
Not all wood is created equal. The best way to restain kitchen cabinets involves understanding the species you’re working with:
- Oak (Red and White): Oak has a very pronounced, open grain. It’s incredibly durable and takes stain well, but it can look “dated” if the stain is too orange. Darker, cooler browns are currently trending for oak in 2026.
- Maple and Cherry: These are closed-grain woods. They can sometimes get “blotchy” with traditional liquid stains. For these, a gel stain is often the superior choice because it sits more evenly on the surface.
- Fiberboard (MDF): You cannot traditionally restain MDF because there is no grain to reveal. If your doors are MDF, painting is your only real refinishing option.
When to Choose Professional Refinishing Over DIY
While a DIY project can be rewarding, there is a significant difference between a “home-done” look and a professional factory-like finish. At T&Z Interior And Exterior Painting, we use high-end HVLP (High Volume Low Pressure) sprayers and professional-grade materials that simply aren’t available at the local hardware store.
If you are looking for Cabinet Painting Naperville, you’ll notice that professional results offer a level of smoothness and durability that stands up to 10–15 years of heavy use. Professionals also handle the heavy lifting of degreasing and sanding, ensuring that the new finish won’t peel or chip a year down the road.
Essential Preparation: The Foundation of a Professional Finish
You’ve heard it before, but it bears repeating: 90% of a great finish is in the prep work. You cannot skip steps here and expect the stain to stick.

The first step is a total teardown. We always recommend removing every door, drawer front, and piece of hardware. Working on vertical surfaces leads to drips and uneven coloring. By laying the doors flat, the stain can level out naturally. For more detailed insights on the teardown process, you can refer to This Old House’s guide on refinishing kitchen cabinets.
The Labeling Secret: Never assume you’ll remember which door goes where. Use a piece of painter’s tape to number each door and the corresponding cabinet opening. Write the number in the hinge hole or an area that won’t be stained. Place all screws and hinges in labeled plastic bags. This small step saves hours of frustration during reassembly.
Cleaning and Degreasing for the Best Way to Restain Kitchen Cabinets
Kitchens are grease traps. Even if your cabinets look clean, they are likely covered in a thin film of cooking oils and steam residue. If you apply stain over grease, it will never cure properly.
We recommend using Trisodium Phosphate (TSP) or a strong mineral spirit solution. Scrub every inch of the frames and doors with a synthetic steel wool pad. This doesn’t just clean; it begins the “de-glossing” process, which helps the new finish bite into the wood. After cleaning, wipe everything down with a fresh tack cloth to remove every microscopic speck of dust.
Safety Protocols and Workspace Setup
Stains and sealers—especially oil-based ones—emit strong fumes. Proper ventilation is non-negotiable. If you’re working in your kitchen, open the windows and use box fans to create a cross-breeze.
- PPE: Wear a respirator (not just a dust mask), chemical-resistant gloves, and eye protection.
- Floor Protection: Use builder’s paper or heavy-duty drop cloths. Avoid thin plastic, as it can be slippery when wet with stain.
- Combustion Warning: This is vital. Oily rags used for staining can spontaneously combust if left in a pile. Always hang them individually to dry completely before disposing of them.
Step-by-Step Guide: Restaining Without Full Stripping
In the past, the only way to restain was to strip the cabinets down to bare wood using harsh chemicals and hours of sanding. In 2026, the best way to restain kitchen cabinets darker is often the “no-strip” method using gel stains or tinted polyurethanes like Minwax PolyShades. This approach is similar to methods used to restore kitchen cabinets without full sanding, making it a popular choice for modern updates.

Gel stains are thick—almost like pudding—and they sit on top of the existing finish rather than soaking deep into the wood fibers. This allows you to change the color of your cabinets without the mess of a full strip-down.
The Process:
- Scuff Sand: Use 220-grit sandpaper to lightly scuff the surface. You aren’t trying to remove the old color; you’re just removing the shine so the new stain has “tooth” to grab onto.
- Clean: Use a tack cloth to remove all sanding dust.
- Test: Always test your color on the back of a cabinet door first.
Applying the First Coat for a Uniform Look
When applying gel stain, less is more. Use a high-quality natural bristle brush or a foam applicator. Apply the stain in long, even strokes following the direction of the wood grain.
The “Wipe-Off” Technique: Some homeowners prefer to apply the stain and then immediately wipe it back with a clean, lint-free rag. This leaves a more transparent look that shows more grain. If you want a deeper, more solid color, let the stain sit longer or apply it slightly thicker (though still in thin coats to avoid drips).
Building Depth and Color Consistency
One coat rarely does the trick. To get that rich, professional depth, you’ll likely need two or even three coats.
Crucial Timing: You must let the stain dry for at least 24 hours between coats. If the first coat is still tacky when you apply the second, you’ll end up with a gummy mess that may never dry. Between coats, very lightly buff the surface with #0000 steel wool to knock down any dust nibs, then wipe clean again.
Advanced Techniques for a Flawless Wood Grain
To take your cabinets from “refreshed” to “high-end,” consider the details. Sometimes, a simple restain isn’t enough to hide the underlying “pinkness” of red oak or the “yellowness” of old maple.
Expert finishers often use a “toner” or a very thin paint wash before staining to neutralize unwanted undertones. For example, a very diluted black paint wash can sit in the deep grain of oak, providing a beautiful “cerused” or two-tone effect once the main stain is applied over it.
If you decide that the grain is too much for your taste, you might wonder Can You Paint Kitchen Cabinets instead? Painting is a great alternative if the wood condition is poor or if you want a completely smooth, modern look.
Avoiding Common Mistakes in the Restaining Process
- Lap Marks: These happen when you let an edge dry and then overlap it with wet stain. Always work on one door or one frame section at a time to maintain a “wet edge.”
- Drip Management: Check the corners and “profiles” (the routed edges) of the doors constantly for the first 20 minutes after application. Stain tends to pool in these areas.
- Humidity Control: High humidity in Illinois can double your drying time. If it’s a rainy week in Lombard, give your cabinets extra time to cure.
Matching Your New Stain to Kitchen Elements
Your cabinets don’t live in a vacuum. The best way to restain kitchen cabinets is to consider the “big three”: countertops, flooring, and lighting.
- Countertops: If you have white quartz, a dark espresso or “Tudor” stain provides a stunning contrast.
- Flooring: Try to avoid having your cabinets and floors be the exact same shade. If they match too closely, the kitchen can feel like a “wood box.” Aim for at least two shades of difference.
- Lighting: Dark stains absorb light. If your kitchen doesn’t have much natural light, consider a medium-toned stain rather than a near-black one to keep the space from feeling cramped.
Durability and Maintenance for Long-Lasting Results
Once your stain is perfect, you need to protect it. While some products like PolyShades have a built-in sealer, we generally recommend a separate topcoat for maximum durability.
A high-quality polyurethane in a satin or semi-gloss finish is the industry standard. This provides a hard, plastic-like barrier that protects against the “big three” kitchen killers: water, grease, and heat. For more information on how we protect these surfaces, check out our cabinet painting services.
Pro Maintenance Tips:
- Soft-Close Everything: The #1 cause of cabinet finish failure is the physical impact of doors slamming. Installing soft-close hinges and bumpers can add years to your finish.
- Gentle Cleaning: Never use harsh abrasives or vinegar on stained wood. A simple solution of mild dish soap and warm water on a soft microfiber cloth is all you need.
- Moisture Control: Always wipe up spills immediately, especially around the sink and dishwasher, where steam and standing water can soften the finish over time.
Frequently Asked Questions about the Best Way to Restain Kitchen Cabinets
How long does the restaining process take to cure?
While the cabinets may feel dry to the touch in 24 hours, “curing” is a chemical process that takes longer. We recommend waiting at least 48–72 hours before reattaching hardware and 7–14 days before heavy scrubbing or using harsh cleaners.
Can you restain cabinets darker without sanding to bare wood?
Yes! Using the gel stain or tinted polyurethane method mentioned above, you can successfully darken your cabinets with only a light scuff-sanding. However, you cannot go lighter without stripping the wood entirely to its natural state.
Is restaining more durable than painting for high-traffic kitchens?
Both are extremely durable when done professionally. However, stain has a slight edge in “hiding” wear. Because stain penetrates the wood, a small scratch is often less visible than a chip in opaque paint. Stained wood also tends to hide fingerprints and daily grime better than solid white or navy paint.
Conclusion
Restaining your kitchen cabinets is a journey that requires patience, the right tools, and a commitment to preparation. When done correctly, it is the best way to restain kitchen cabinets to achieve a luxury look without the luxury price tag of a full replacement.
At T&Z Interior And Exterior Painting, we’ve spent over 15 years perfecting the art of the finish. Based in Lombard, IL, and serving communities from Elmhurst to Naperville and beyond, our licensed and insured teams are dedicated to delivering stunning, long-lasting results. We use top-tier materials and a meticulous process to ensure your kitchen remains the heart of your home for years to come.
Ready for a change? Transform your kitchen with professional cabinet painting and refinishing and see the difference that expert craftsmanship can make. Whether you want to embrace the natural grain of your oak cabinets or move toward a sleek, modern painted finish, we are here to help you bring your vision to life.