
Why Waterproofing Paint for Interior Walls Is the First Line of Defense Against Basement Moisture
Waterproofing paint for interior walls is a specially formulated coating designed to block water from seeping through masonry surfaces like concrete, cinder block, brick, and stucco. Unlike regular latex paint, it creates a barrier that resists hydrostatic pressure — the force of water pushing against your basement walls from the outside.
Quick answer: The best waterproofing paints for interior walls in 2026
| Product | Best For | Warranty | Water Pressure Resistance |
|---|---|---|---|
| DRYLOK Extreme | Below-grade masonry | 15 years | Up to 15 psi |
| KILZ Basement & Masonry | Concrete, cinder block, stucco | 10 years | Standard |
| Zinsser WaterTite | Wet or dry surfaces | Varies | Up to 34 psi |
Key things to know before you buy:
- Two coats minimum are required for any meaningful waterproofing protection
- Coverage ranges from 75 to 125 sq ft per gallon, depending on surface texture
- Most products apply between 50°F and 90°F and need 7–14 days to fully cure
- Waterproofing paint does not fix active leaks or underlying structural issues — surface prep comes first
Damp basement walls are one of the most common headaches for homeowners in the Chicago suburbs. Water stains, peeling paint, that musty smell — they’re all signs that moisture is working its way through your masonry. Left untreated, this leads to mold, structural damage, and a finished basement that never quite feels finished.
One important caveat worth stating upfront: waterproofing paint is not a magic fix for a wet basement. As industry experts put it, applying waterproof paint over a damp wall without addressing the root cause is like covering spilled wine with newspaper — it hides the problem without solving it.
I’m Tomasz Niemotko, owner of T&Z Interior And Exterior Painting, and over more than 13 years of applying specialty coatings and waterproofing paints for homeowners across Lombard, Addison, Glen Ellyn, and surrounding communities, I’ve seen what waterproofing paint for interior walls can — and can’t — do. In this guide, I’ll walk you through exactly how to choose, prepare for, and apply the right product so your basement stays dry for years to come.

Learn more about waterproofing paint for interior walls:
Understanding Waterproofing Paint for Interior Walls
To understand how waterproofing paint for interior walls works, we first have to understand the enemy: hydrostatic pressure. When rain falls or snow melts in areas like Wheaton or Downers Grove, the surrounding soil becomes saturated. This water exerts immense pressure against your below-grade foundation walls, forcing moisture through the microscopic pores of concrete, brick, or cinder block.
Standard latex paints, such as MONARCH® MOPAKO™ Interior Latex, are fantastic for adding color and a clean finish to drywall in your living room or bedroom. However, they are thin, film-forming products. When water pushes from behind the wall (negative side pressure), regular paint simply bubbles, blisters, and peels away.
Waterproofing paint is completely different. It is highly viscous, thick, and designed to penetrate deep into the pores of the masonry. Once inside, it expands and chemically bonds to the substrate, creating a physical plug that stops water in its tracks.
Furthermore, high-quality waterproofing paints balance water-blocking strength with breathability. A breathable, microporous structure allows trapped water vapor to escape outward without letting liquid water in. If a coating is completely impermeable, it can trap moisture behind the wall, leading to structural rot or masonry degradation over time.
Choosing the right formula depends on the level of moisture you’re dealing with and the finished look you want to achieve. For more details on choosing sheens and finishes, check out our guide on Everything You Need to Know About Wall Paint Finishes.

When to Use Waterproofing Paint for Interior Walls
We generally recommend using waterproofing paint on interior masonry walls that are exposed to dampness or light water seepage. This includes:
- Below-grade basements: Perfect for block or poured concrete walls that feel cold or damp to the touch.
- Retaining walls: Interior surfaces holding back soil.
- Masonry foundations: Older brick or stone foundations common in historic parts of Chicago and La Grange.
- Preventing efflorescence: That white, powdery salt deposit left behind when water evaporates on masonry.
If you are dealing with minor dampness or want to protect a newly built basement before finishing it, waterproofing paint is an excellent preventative step. However, if you are experiencing severe structural cracking or actual pooling water, you will need to address the root cause first.
Homeowners in our service areas often pair interior coatings with local professional drainage solutions, such as Get Basement Walls Waterproofing in Lombard, IL, Quality Wheaton IL Basement Waterproofing, Get Basement Walls Waterproofing in Lemont, IL, Downers Grove, IL Foundation Repair & Basement Waterproofing, Get Basement Walls Waterproofing in Carol Stream, IL, or La Grange Waterproofing.
Selecting the Best Waterproofing Paint for Interior Walls
There are four primary types of waterproofing paints and coatings available:
- Latex-Based Masonry Waterproofers: These are the most popular DIY-friendly options. Products like KILZ® Basement & Masonry Waterproofer utilize advanced acrylic resins and nanotechnology to penetrate and seal concrete pores. They are low-odor, clean up easily with soap and water, and are highly resistant to alkali.
- Silicate-Based Paints: These paints chemically react with the minerals in concrete or plaster to form a hard, crystalline structure. They are highly breathable and will never peel or flake because they become an actual part of the wall.
- Two-Component (2K) Cementitious Coatings: Ideal for severe dampness and high hydrostatic pressure. An advanced product like Dampness Proof 2K Paint – Alldry Total 2K | Birla Opus combines a liquid polymer with a powder cementitious base. It can withstand up to 5 bar of positive and 4 bar of negative hydrostatic pressure, making it incredibly resilient.
- Elastomeric Coatings: These coatings are highly elastic (some stretch up to 400%) and are excellent for bridging hairline cracks that expand and contract with seasonal temperature swings in Illinois.
Suitable Surfaces and Wall Types
Before diving into application, it’s important to identify your wall type. Waterproofing paints perform beautifully on bare, porous masonry, but they will not bond to wood, drywall, metal, or previously painted walls (unless the old paint is completely removed or is a compatible cementitious coating).
- Poured Concrete: Dense and smooth, poured concrete walls must be clean and free of form-release agents. They often require acid-etching to open up the pores before painting.
- Cinder Blocks & Concrete Blocks: Extremely porous with many deep voids. These require a heavy-handed application to ensure the paint fills every tiny pinhole.
- Brick and Stone: Older brick can be highly sensitive to moisture trapping. Using a highly breathable coating is essential here.
- Stucco: Suitable for both interior and exterior applications, provided it has cured for at least 30 days.
For high-end moisture regulation and mold prevention, Swiss-engineered silicate coatings are a phenomenal choice. The IP-ST-Ppolymer-silicate interior paint – Terrix chemically bonds to mineral substrates, drastically reducing flaking risks while its high pH naturally repels mold and mildew without harsh biocides.

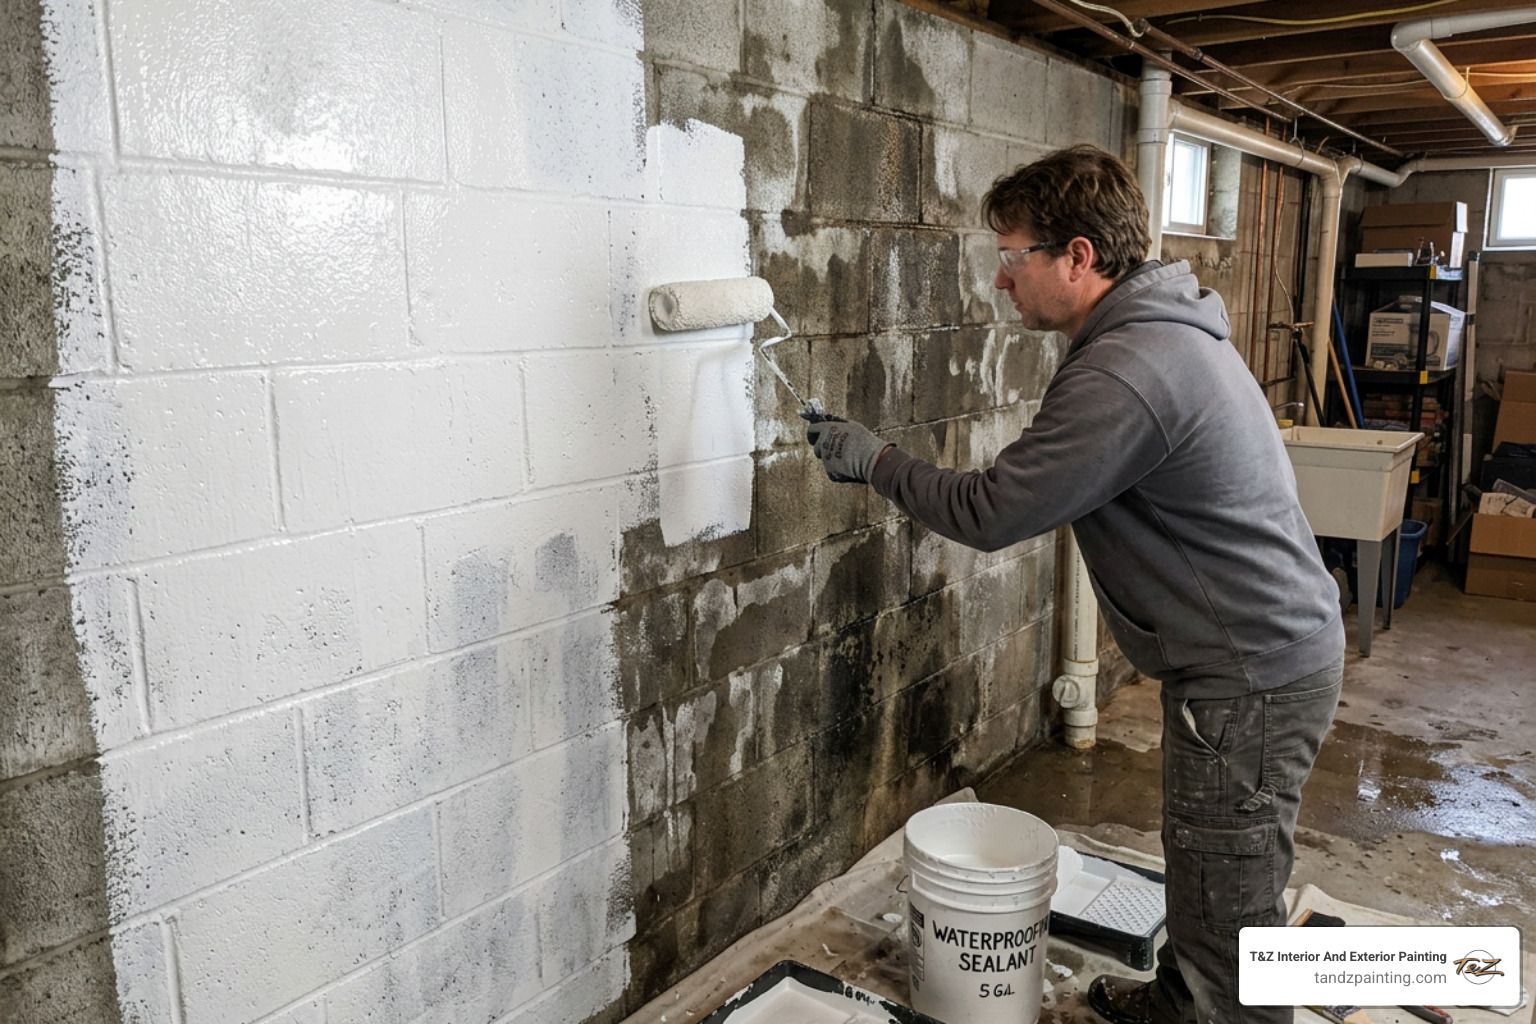
Step-by-Step Surface Preparation and Application
Ask any professional painter and they will tell you: painting is 90% preparation and 10% application. This rule is doubly true for waterproofing. If you apply the best waterproofing paint over a dirty, dusty, or crumbling wall, the paint will fail.
Here is our step-by-step guide to preparing and painting your interior masonry walls:
Step 1: Clean the Surface
Remove all dirt, dust, grease, and loose mortar. If you have efflorescence (the white powdery substance), you must remove it. Use a wire brush or a specialized masonry cleaner like sulfamic acid or a muriatic acid etch. Rinse thoroughly and let dry.
Step 2: Repair Cracks and Holes
Inspect the walls for structural defects. Small hairline cracks can be filled with elastomeric caulk or the paint itself. For larger cracks, holes, or active leaks, use a fast-setting hydraulic cement. Hydraulic cement expands as it cures, creating a watertight plug. For a detailed breakdown of these prep steps, read our guide on Waterproofing Surface Preparation.
Step 3: Test for Moisture and Adhesion
To check if your walls are dry enough to paint, tape a 12×12-inch sheet of plastic wrap tightly to the masonry. Wait 24 hours. If condensation forms on the inside of the plastic, the wall is too wet to paint. If you are working in historic homes in Lockport or Plainfield, you may want to consult local specialists, such as Professional Painters in Lockport, IL or top-rated teams found on THE BEST 10 PAINTERS IN PLAINFIELD, IL, to ensure structural integrity before sealing.
| Application Tool | Best For | Recommended Specs | Coverage Rate |
|---|---|---|---|
| Nylon/Polyester Brush | Cutting in, filling deep pores in block | 4-inch wide, stiff bristles | 75–100 sq ft/gal |
| Heavy Nap Roller | Large, rough surfaces | 1/2″ to 3/4″ nap | 75–100 sq ft/gal |
| Airless Sprayer | Rapid, seamless coverage | 2200–3200 PSI, .023″-.025″ tip | 100–125 sq ft/gal |
Step 4: Apply the First Coat
Stir the paint thoroughly—do not dilute it. Using a high-quality brush or roller, work the paint deep into the pores, cracks, and crevices of the masonry. If using a roller, back-brush the surface to ensure complete, pinhole-free coverage.
Step 5: Apply the Second Coat
Wait the manufacturer’s recommended recoat time (usually 2 to 4 hours). Apply the second coat across the entire surface. Inspect the wall with a flashlight to ensure there are no tiny pinholes remaining; if you spot any, spot-prime them immediately.
Key Features, Drying Times, and Limitations
When shopping for waterproofing paint for interior walls, look for these crucial features:
- Mildew Resistance: High-humidity areas are breeding grounds for mold. Choose a paint with a built-in, mildew-resistant dry film.
- Low VOC / Low Odor: Because basements have limited ventilation, low-VOC (volatile organic compound) paints are a must to keep your home safe and comfortable during application. For more on managing paint smells, see our article Your Nose Knows: Choosing the Right Odor Sealing Paint.
- Warranties: Premium products like DRYLOK Extreme carry up to a 15-year warranty, while KILZ Basement & Masonry offers a 10-year limited warranty.
Drying and Curing Times
Do not mistake “dry to the touch” for fully cured.
- Dry to Touch: 45 minutes to 1 hour.
- Recoat Time: 2 to 4 hours.
- Full Cure: 7 to 14 days.
During the curing process, keep the basement well-ventilated. High humidity or temperatures below 50°F will significantly delay curing times. Avoid scrubbing or exposing the walls to heavy moisture during this critical window.
Crucial Limitations
Waterproofing masonry paints are designed specifically for vertical masonry walls. Do not use them on floors unless the product explicitly states it is formulated for traffic. Normal masonry paint cannot handle the foot traffic or the sheer weight of appliances, causing it to peel and flake off within weeks.
Frequently Asked Questions About Interior Waterproofing
Can you paint over waterproofing paint?
Yes! Once your waterproofing paint has fully cured (usually 24 to 48 hours), you can topcoat it with a high-quality latex paint to achieve your desired color and sheen. For a beautiful matte finish that offers incredible durability, we love using KILZ TRIBUTE® – INTERIOR MATTE PAINT. To learn more about selecting sheens for your topcoat, check out Demystifying Paint Finishes: How to Choose the Right Sheen for Every Room.
Does waterproofing paint stop active leaks?
No. Waterproofing paint is designed to block moisture vapor and minor dampness. It cannot stop active, flowing water or seal wide structural cracks. Active leaks must be repaired using hydraulic cement, epoxy injections, or exterior drainage systems before any paint is applied.
Can waterproofing paint be used on basement floors?
Generally, no. Standard wall waterproofing paints will fail on floors due to foot traffic and abrasion. If you need to waterproof a concrete floor, you must use a specialized product like DRYLOK Floor & Wall Masonry Waterproofer or a dedicated industrial epoxy system.
Conclusion
Applying waterproofing paint for interior walls is a highly effective way to protect your home from dampness, musty odors, and efflorescence. However, the success of the project hinges entirely on meticulous surface preparation and using the correct application techniques.
If the prep work feels overwhelming, or if you want to ensure your basement walls are sealed perfectly the first time, we are here to help. At T&Z Interior And Exterior Painting, we bring over 13 years of professional experience, top-brand materials, and a licensed, insured team to every job in Lombard, Wheaton, Elmhurst, and across the Chicago suburbs.
Let us transform your basement into a dry, beautiful, and usable space. For more expert tips, read our Interior Painting Contractor Guide or learn about our Professional Wall Painting process.
Ready to get started? Schedule professional interior painting services with T&Z Painting today!