
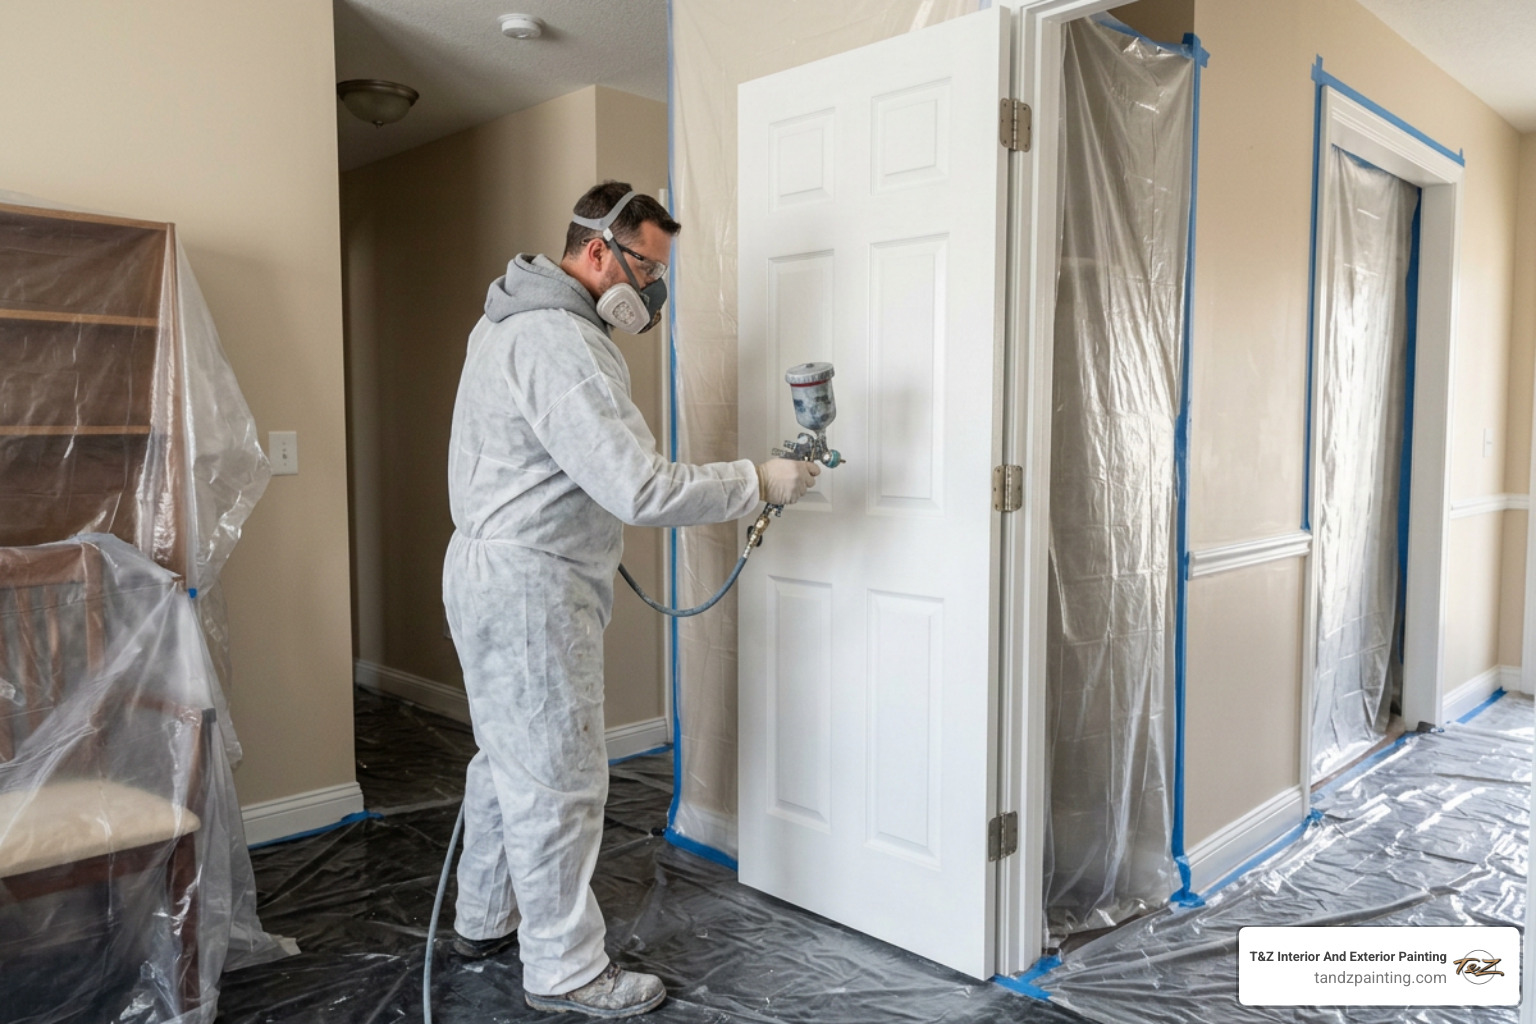
Why Spraying Internal Doors Gets You a Better Finish Faster
Spraying internal doors is one of the fastest ways to get a smooth, factory-quality finish — without the brush marks and roller texture that hand-painting leaves behind.
Here’s a quick overview of what you need to know:
- Best for: Multiple doors, new builds, full interior refreshes
- Active work time: As little as 10–15 minutes per door with a sprayer
- Finish quality: Even, streak-free coat — no brush marks or roller stipple
- Best paint: 2K polyurethane or alkyd urethane enamel for durability
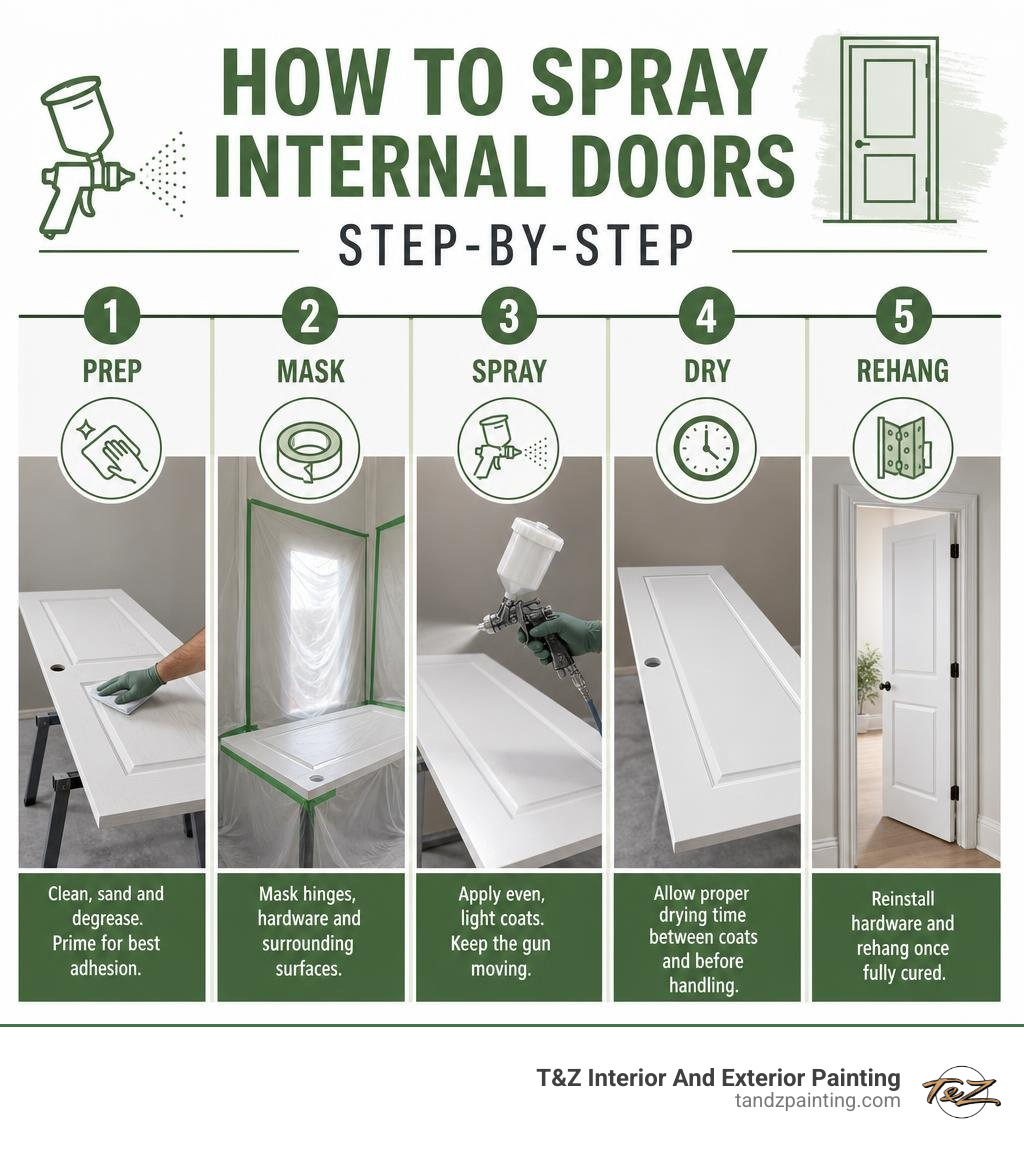
- Key prep steps: Clean, sand, degrease, prime, then mask surrounding surfaces
- Biggest risk: Overspray — control it with proper masking and technique
- How long it lasts: 8–15 years with quality coatings under normal indoor conditions
Most homeowners don’t realize how much of a difference the method makes. Hand-painting seven doors can take 5–6 hours of active work. A sprayer cuts that down dramatically — one coat on four doors takes roughly 10 minutes with an airless sprayer. The results also look significantly better: no streaks, no lap marks, just a clean, consistent finish.
That said, spraying indoors comes with real challenges. Overspray, ventilation, drying logistics, and proper surface prep all have to be handled correctly. Skip a step and you’ll end up with runs, orange peel texture, or paint that chips within months.
This guide walks you through the full process — from gear and paint selection to technique and common mistakes — so you get professional results the first time.
I’m Tomasz Niemotko, owner of T&Z Interior And Exterior Painting, with over 13 years of hands-on experience in residential and commercial painting, including spraying internal doors across Lombard, IL and the surrounding suburbs. The techniques in this guide come directly from real projects where finish quality and efficiency both matter.
Important spraying internal doors terms:
The Professional Advantages of Spraying Internal Doors
When updating the interior of a home, doors are often overlooked. Yet, they are some of the most frequently touched and highly visible elements in any room. Redecorating them can completely revitalize a living space, but the application method you choose determines how long that fresh look lasts and how smooth it feels to the touch.
Why Spraying Internal Doors Beats Brushing and Rolling
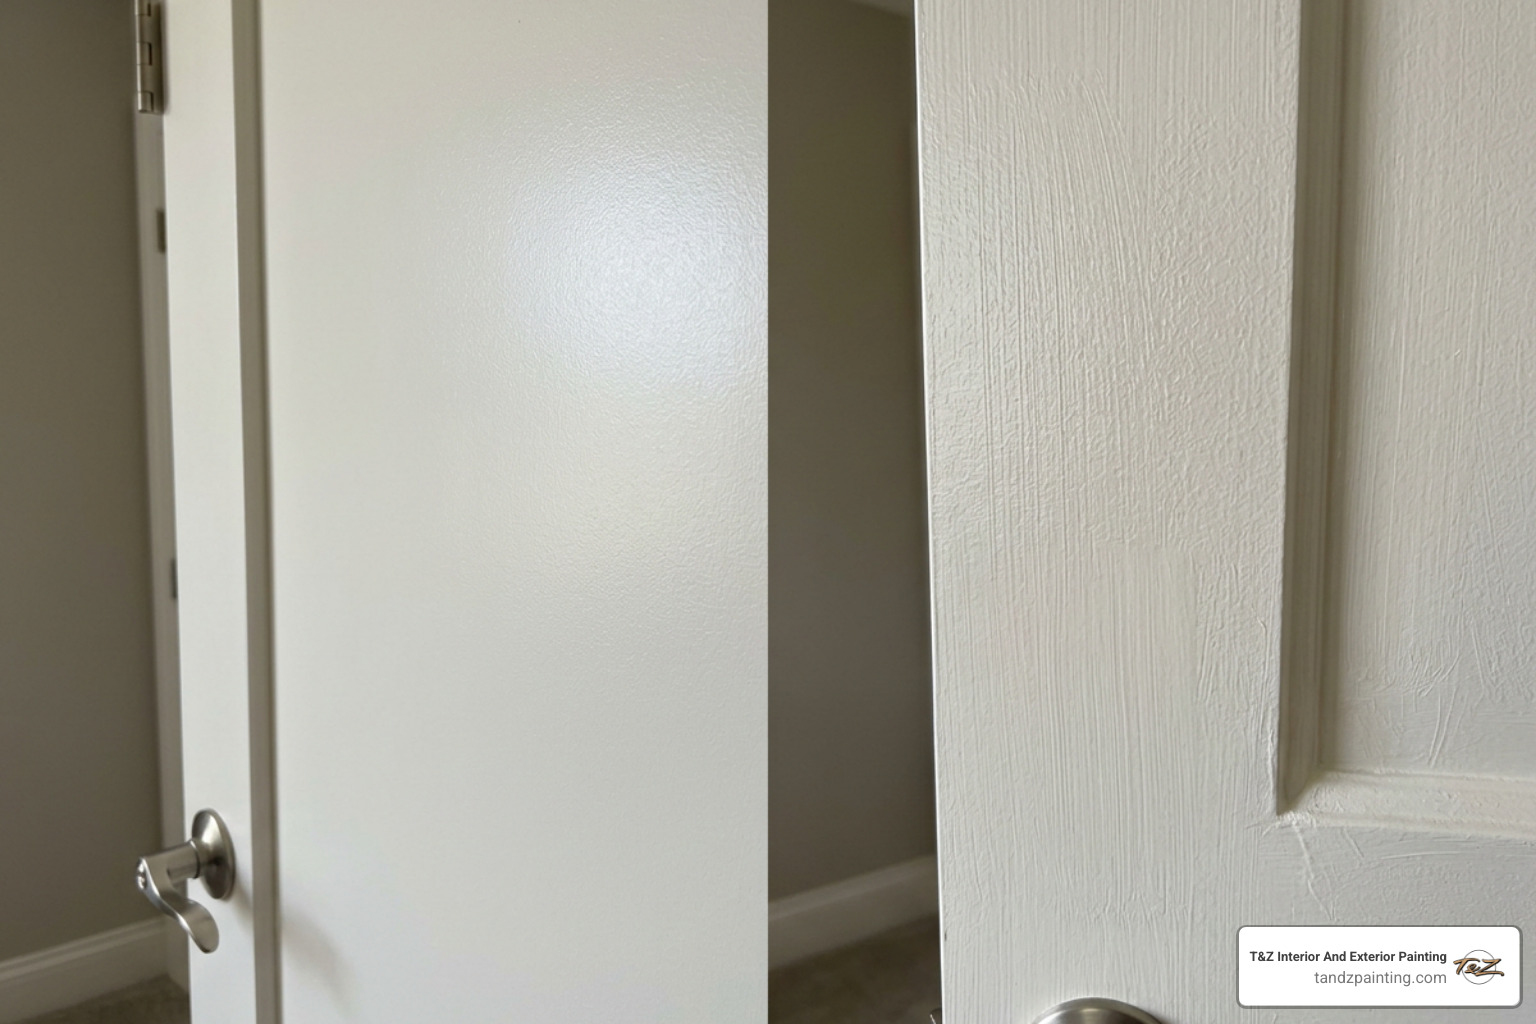
If you have ever tried to hand-paint a door with a brush or a traditional roller, you know how difficult it is to avoid imperfections. Brushes leave tracks, and rollers create a textured, bumpy finish known as “orange peel” or “stipple.” Additionally, doors with recessed panels, intricate moldings, or raised details are notorious for catching excess paint, which pools in the corners and creates ugly, dried drips.
By choosing to spray, you bypass these issues entirely. A professional spray gun atomizes the paint into a fine mist, distributing it evenly across flat faces and deep profiles alike.
The differences in speed and labor are night and day:
- The Hand-Painting Grind: Hand-painting a single door with a brush and a foam roller requires meticulous attention. You must paint the inset panels first, then the vertical stiles, and finally the horizontal rails, constantly back-rolling to blend wet edges before they dry. For a set of seven doors, this process can easily consume 5 to 6 hours of continuous, hand-cramping labor.
- The Spraying Alternative: Using a professional airless or HVLP setup, the active spraying time is reduced to just 10 to 15 minutes per door. Applying one coat to four doors takes less than 10 minutes of continuous spraying. This speed is especially valuable for larger residential or commercial properties where dozens of doors must be completed on a tight schedule. To understand how this efficiency scales to larger projects, read our guide on Spray Painting for Large Surfaces.
| Feature / Metric | Spray Painting | Brush & Roller Painting |
|---|---|---|
| Active Work Time (per door) | 10–15 minutes | 45–60 minutes |
| Surface Texture | Completely flat, factory-smooth | Visible brush strokes or roller stipple |
| Deep Recesses & Profiles | Effortless, even coverage | Heavy pooling and runs in corners |
| Physical Strain | Minimal (no wrist fatigue) | High (repetitive hand cramping) |
| Preparation Required | High (extensive masking/isolation) | Low to moderate |
Long-Term Durability of Sprayed Finishes
Beyond aesthetics and speed, durability is where spraying truly shines. Internal doors are high-traffic surfaces. They are constantly pushed, kicked, slammed, and touched by dirty hands. Standard wall paint applied with a roller will quickly scuff, chip, and wear away around the handle.
When we spray doors, we typically use specialized, high-performance coatings like 2K (two-component) polyurethanes or premium alkyd urethanes. These coatings undergo a chemical curing process that creates an incredibly hard, scratch-resistant barrier.
A professionally sprayed door finished with these advanced coatings will maintain its pristine, factory-like appearance for 8 to 15 years under normal household conditions. To choose the perfect level of reflection and durability for your home, take a look at Paint Sheens 101: The Official Guide to Choosing the Right Finish.
Essential Gear and Paint Selection
To achieve a flawless, streak-free finish, you must pair the right spraying equipment with a paint formulation designed to level out smoothly.

Key Equipment for Spraying Internal Doors
There are two primary types of spray systems used for internal doors: Airless and HVLP (High Volume Low Pressure).
- Airless Sprayers: These systems pump paint at incredibly high pressure through a small tip, atomizing the fluid without using compressed air. They are highly efficient, can spray unthinned paints directly from the can, and are ideal when you have a large volume of doors to complete. When using an airless sprayer on doors and trim, we recommend using a narrow spray tip with a 6-inch or 8-inch fan width. This allows for precise control and reduces overspray.
- HVLP Sprayers: These systems use a high volume of air at a lower pressure to atomize the paint. This results in a highly controllable, softer spray pattern with minimal overspray. HVLP is the preferred choice for intricate, detailed doors or when spraying in highly sensitive indoor environments.
For a deeper dive into choosing the right setup, check out our comprehensive Spray Painting Services Guide. If you are looking for professional results in the Chicago suburban area, hiring a team with specialized equipment is the best way to ensure a flawless finish.
Choosing the Right Paint and Coatings
You cannot use standard latex wall paint if you want a factory-smooth finish on your doors. Standard wall paints do not have the self-leveling properties required to lay completely flat, and they lack the hardness to resist daily hand oils and impact.
Instead, look for these premium coatings:
- Water-Based Alkyd Urethanes: These modern paints offer the best of both worlds. They clean up with water and have low VOC emissions, but they cure to the hard, durable finish of a traditional oil-based paint. They are highly self-leveling, meaning any minor texture from application naturally flattens out as the paint dries.
- 2K Polyurethane Coatings: Primarily used by professional spraying companies, these dual-component coatings require mixing a hardener into the paint before application. Once cured, they offer unparalleled resistance to scratches, chemicals, and moisture, making them the gold standard for high-traffic homes and commercial spaces.
Choosing the right sheen is also crucial. Most homeowners opt for satin or semi-gloss finishes because they reflect just enough light to highlight the door’s architectural details while remaining incredibly easy to wipe clean. Learn more about matching sheens to different trim elements in our guide, Everything You Need to Know About Wall Paint Finishes.
Step-by-Step Preparation and Masking
In spray painting, 80% of the work happens before you ever pull the trigger on the spray gun. Meticulous preparation is what separates a messy DIY job from a crisp, professional finish.
Surface Prep and Repair
Spraying highlights every single imperfection on a door. If there is a tiny dent, a scratch, or a rough patch of old paint, the smooth, reflective nature of a sprayed coating will make it stand out.
- Clean and Degrease: Doors accumulate oils from hands, pet dander, and household dust. Wipe down the entire surface with a dedicated degreaser or TSP (trisodium phosphate) substitute.
- Fill Imperfections: Use a high-quality wood filler or polyester blemish paste to fill any dents, gouges, or old screw holes. Overfill slightly, as these compounds tend to shrink as they dry.
- Sand Thoroughly: Once the filler is dry, sand the entire door flat. If you are dealing with pre-existing paint or varnish, sand the surface with 180-grit to 220-grit sandpaper to create a “key” (a micro-textured surface) that allows the new paint to adhere properly.
- Remove Dust: Vacuum the doors and the surrounding work area. Then, run a clean tack cloth over the entire surface of the doors to pick up any microscopic dust particles.
- Apply Adhesion Primer: If you are spraying veneered, laminate, or previously varnished doors, apply a high-quality bonding primer. This ensures the topcoats bond permanently without peeling.
For detailed interior prep strategies, see our article on Spray Painting House Interior.
Masking and Overspray Control
Overspray is the fine mist of paint dry-floating through the air during spraying. If you do not isolate your workspace, this mist will settle on your floors, walls, and furniture, leaving a gritty, difficult-to-clean residue.
If you are spraying the doors in place (still hanging on their hinges), you must build a protective envelope:
- Protect the Walls and Floors: Tape heavy-duty plastic sheeting or rosin paper to the floors and walls surrounding the door frame. Extend this protection at least 5 to 6 feet outward from the spray zone.
- Protect the Hinges and Hardware: While we highly recommend removing all doorknobs and hinges before painting, if you must leave them in place, mask them carefully. Apply painter’s tape over the metal and use a sharp utility knife to trace the exact edge of the hinge, removing the excess tape for a perfect seal.
- Seal Adjacent Rooms: Hang plastic dust barriers in doorways to prevent paint mist from migrating to other parts of the house.
For residents in our local service areas, we provide professional residential painting that eliminates the stress of masking and cleanup. We proudly serve homeowners throughout the western and southwestern suburbs, including Lombard, Lemont, Downers Grove, Carol Stream, La Grange, Plainfield, and surrounding communities, ensuring a flawless finish with zero hassle.
Advanced Techniques: Spraying Both Sides and Managing Logistics
One of the biggest logistical hurdles when spraying internal doors is figuring out where and how to dry them. If you lay a door flat on sawhorses, you can only paint one side at a time, forcing you to wait hours for the paint to dry and cure before flipping it over. This doubles your project timeline and increases the risk of damaging the freshly painted side.
The Spray-and-Dry Method for Both Sides
To maximize efficiency, professionals use specialized systems that allow them to spray both sides of a door in a single session and dry them vertically.
- Using VClips and Turntables: In a controlled setup, a foot-operated turntable allows the operator to stand in one place and rotate the door. Specialized metal VClips are screwed into the top and bottom edges of the door (areas that are invisible once the door is hung). These clips allow you to lift the wet door safely and stand it upright.
- The Temporary Leg Hack: For a DIY-friendly approach, you can screw small temporary wood legs or furring strips to the bottom edge of the doors. By angling these legs, the doors can stand upright on their own. You can then walk around the door, spray both sides, and leave it to dry in place without touching any wet paint.
- The Zig-Zag Method: If you are painting multiple doors in a garage or basement, you can connect them in a temporary zig-zag line using scrap 1×2 wood strips screwed across the top edges. This holds the doors stable, allowing you to walk down the line and spray every face and edge in one continuous pass.
These space-saving methods allow a single operator to finish and dry up to 20 doors in a highly confined footprint. For more tips on setting up local projects, explore Local Spray Paint Services: Your Go-To for Quality Finishes.
Off-Site vs. In-Place Spraying
Deciding whether to remove the doors for off-site spraying or paint them in place depends on your home’s layout and your tolerance for disruption.
- In-Place Spraying: This involves keeping the doors on their hinges and masking off the entire room. While it saves you from transporting heavy doors, it requires extensive masking, and your home will be temporarily unusable due to the protective plastic and paint fumes.
- Off-Site/Workshop Spraying: Removing the doors and transporting them to a dedicated workshop is often the cleanest option. The doors are sanded, primed, and sprayed in a dust-free, controlled environment with professional ventilation. Meanwhile, the door frames are carefully painted or sprayed on-site. This minimizes household disruption and ensures the highest possible finish quality. To see how this workshop-style precision applies to other household fixtures, read about our Professional Cabinet Spraying services.
Common Mistakes to Avoid When Spraying Doors
Even with the best equipment, spray painting requires practice and a steady hand. Avoid these common pitfalls to ensure a flawless finish:
- Holding the Gun Too Close or Too Far: Maintaining a consistent distance of 12 inches from the door is critical. If you get too close, the paint will pile up and run. If you stand too far back, the paint will partially dry in the air before hitting the door, creating a rough, sand-like texture known as dry spray.
- Arcing the Spray Gun: Never swing your wrist in an arc. This causes the spray gun to be closer to the door in the middle of the stroke and farther away at the edges, resulting in uneven paint thickness. Always keep the gun parallel to the door surface, moving your entire arm across the panel.
- Applying Heavy Coats: It is always better to apply two or three thin, even coats rather than trying to get full coverage in one heavy pass. Heavy coats lead to sags, drips, and extended drying times.
- Ignoring the Corners of Recessed Panels: When spraying paneled doors, always spray the recessed profiles and corners first using quick, light passes. Once the details are covered, spray the large, flat vertical and horizontal sections.
- Inadequate Cleaning Between Coats: Dust settles on wet paint. Always run a tack cloth over the door and lightly sand down any imperfections with fine-grit sandpaper between coats to ensure a smooth final finish. For more insights on adjusting your spray technique for different materials, see How to Spray Paint Metal with These 7 Quick Changes.
Frequently Asked Questions
How long does a spray-painted door finish last?
With high-quality preparation and professional-grade coatings (like alkyd urethanes or 2K polyurethanes), a spray-painted door finish will easily last 8 to 15 years. Regular dusting and cleaning with a damp microfiber cloth (avoiding harsh chemicals or abrasive scrubbers) will preserve the paint’s sheen and protect it from wear.
Can you spray paint doors while they are still hanging?
Yes, you can spray doors while they are hanging, but it requires meticulous masking of the hinges, walls, and floors. The main challenge with vertical spraying is that gravity increases the risk of runs and sags if the paint is applied too heavily. Laying doors flat or using vertical stand-offs in a controlled spray area generally yields a more consistent, run-free finish.
What safety gear is required for indoor spraying?
Safety is paramount when atomizing paint indoors. At a minimum, you should wear:
- A dual-cartridge respirator rated for organic vapors (do not use simple dust masks).
- Safety glasses or a full-face shield to protect against paint mist.
- A spray sock or hood to keep overspray out of your hair.
- Nitrile gloves to keep paint off your skin.
- Ensure the workspace is well-ventilated using exhaust fans to pull paint fumes out of the room.
For general guidance on selecting and using respiratory protection, review OSHA’s Respiratory Protection resources and always follow the coating manufacturer’s safety data sheet.
Conclusion
Spraying internal doors is the ultimate way to achieve a sleek, factory-quality finish that elevates your entire home. While the process requires specialized gear, meticulous preparation, and careful technique, the time saved and the sheer beauty of the final result make it well worth the effort.
If you want to transform your home’s interior doors without the mess, hassle, or logistical headache of a DIY project, let our team handle it. At T&Z Interior And Exterior Painting, we bring over 15 years of professional experience, a 5.0 Google Reviews rating, and a licensed, insured team directly to your doorstep. We serve homeowners in Lombard, IL, and surrounding communities like Wheaton, Glen Ellyn, Addison, and beyond, delivering stunning, long-lasting results using only top-brand materials.
Ready to upgrade your home? Transform your home with professional spray painting and let us bring your doors back to life.