
Create a Faux Concrete Wall Finish With Layered Paint
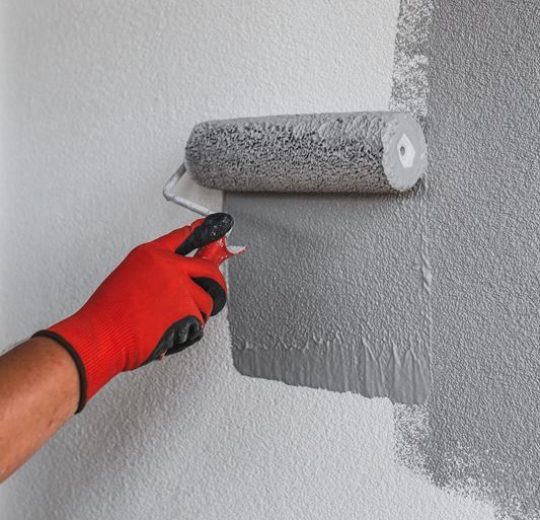
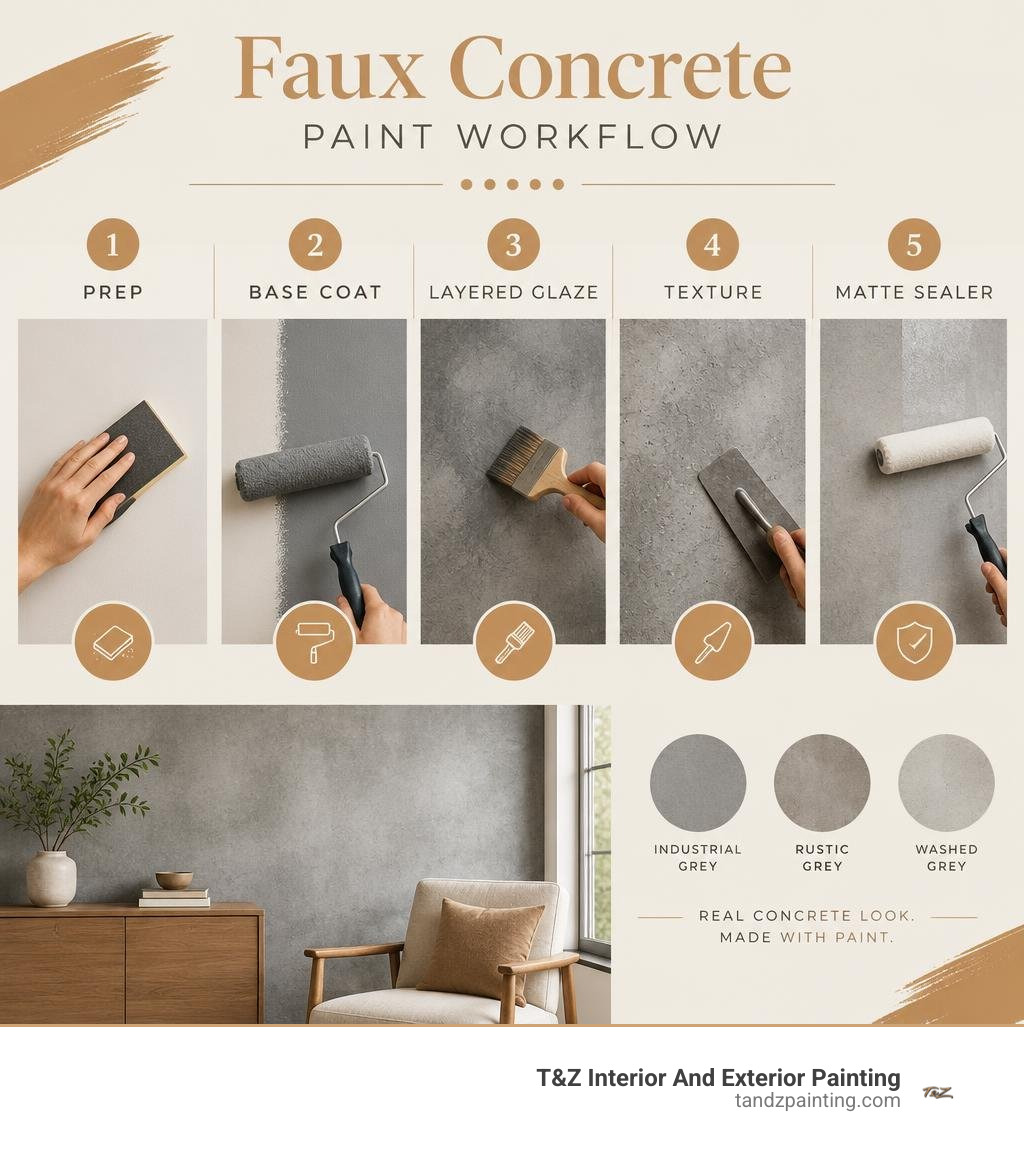
A faux concrete wall finish creates the look of poured concrete using paint, glaze, and light texture rather than heavy panels or real cement. For a convincing DIY result, start with a smooth, primed wall; apply a matte gray base coat; then layer darker and lighter gray tones with a trowel, sponge, or wide brush. Blend the layers while they are still workable, vary the marks, and finish with a clear matte sealer when the wall needs extra washability.
This method works especially well on interior accent walls, home offices, dining rooms, and modern bedrooms. The goal is not a perfectly uniform gray wall. Real concrete has subtle movement, pitting, tonal shifts, and imperfect trowel marks. Testing your colors and technique on a sample board first helps you choose between cooler Industrial Grey, warmer Rustic Grey, or a softer Washed Grey look before painting the full wall.
I am Tomasz Niemotko of T&Z Interior And Exterior Painting, with more than 15 years of experience providing interior painting, drywall repair, textured finishes, and specialty coatings in Lombard, Itasca, Addison, Glen Ellyn, Oak Brook, and surrounding towns. In this guide, I will show the practical steps behind a durable faux concrete wall finish and when professional surface preparation can make the result cleaner and longer-lasting.
Easy faux concrete wall finish word list:
Comparing Methods for Achieving a Faux Concrete Wall Finish
Achieving an industrial, urban edge in your home does not require pouring tons of heavy, structural cement into your living room. Modern wall design relies on several distinct methods to simulate the raw character of concrete, each offering unique textures, installation styles, and practical benefits for residential and commercial interiors.
| Method | Application Style | Weight & Structural Impact | Surface Realism & Texture | Ideal Interior Environment |
|---|---|---|---|---|
| Layered Paint & Glazes | Brush, sea sponge, and rag rolling | Zero structural load; standard paint film | Smooth to sight-textured; subtle tonal depth | Standard drywall accent walls, bedrooms, home offices |
| Textured Plasters & Joint Compounds | Trowel, putty knife, and burnishing tools | Extremely lightweight; thin 1/16-inch skim layer | High tactile relief, authentic pitting, organic mottling | Fireplace surrounds, living room feature walls, dining areas |
| Specialty Architectural Coatings | Multi-step artisan systems and clear protective topcoats | Featherweight; integrated micro-mineral coatings | Museum-grade visual depth, industrial aggregate sheen | Luxury residences, restaurant feature walls, boutique retail |
| Prefabricated Faux Panels | Mechanical fasteners, shiplap joints, construction adhesive | Lightweight (0.5 to 1.0 lb/sq ft depending on 1/2″ or 1″ core) | Molded cast concrete replica with simulated form-tie holes | Basements, commercial backdrops, fast panelized installs |
Paint Glazes vs Textured Coatings
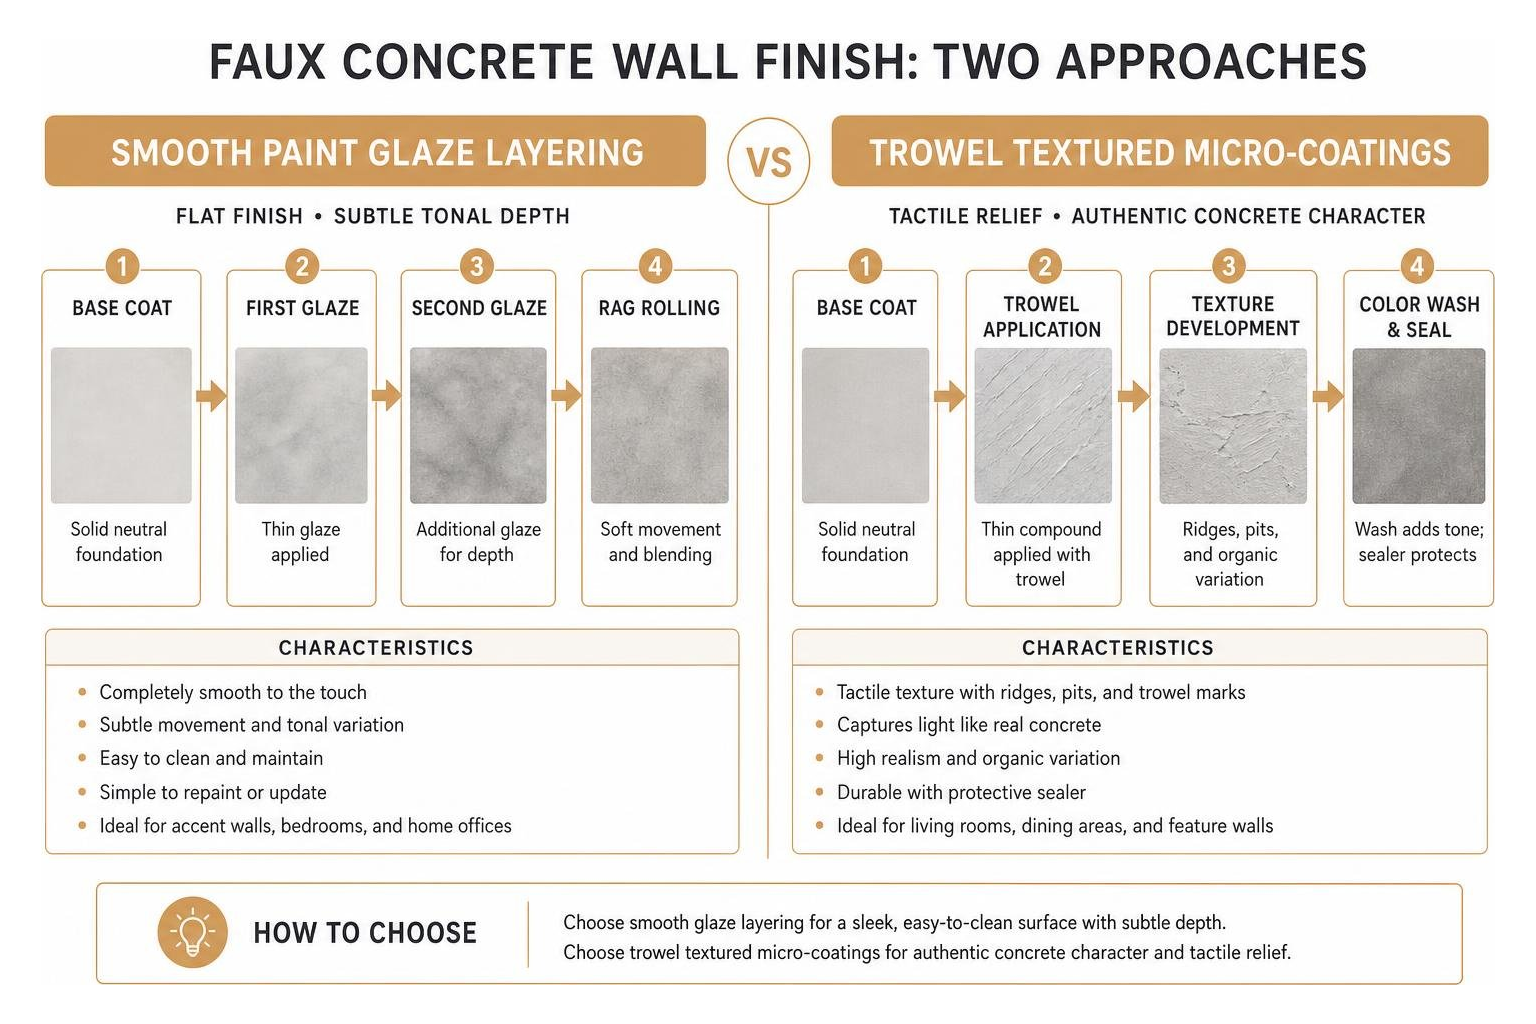
When choosing between a paint glaze system and a textured coating, your primary consideration is tactile depth versus surface smoothness.
Paint glaze techniques rely on liquid acrylic glazes mixed with varying pigment values—such as deep charcoal, slate, and pale mist. By working wet-on-wet, you build visual dimension through translucency and irregular brushwork. This keeps your wall completely flat to the touch, making it exceptionally easy to clean and simple to repaint later if your design tastes change.
Textured coatings, including trowel-applied joint compound or specialty plasters, introduce physical relief to the substrate. Using a flexible steel trowel, we apply thin, irregular passes across the drywall, leaving slight ridges, chatter marks, and subtle pits that mirror real board-formed or precast architectural concrete. Once dried, lightly sanded, and color-washed, the wall captures light just like true masonry.
Choosing a Paint-Based Faux Concrete System
A paint-based system provides unmatched flexibility for interior spaces. Unlike heavy masonry or rigid wallboard assemblies that require structural evaluation and complicated trim work, layered paint systems can be applied over existing drywall, plaster, or masonry surfaces with minimal buildup.
Paint-based applications shine on intricate walls with multiple switch plates, door casings, or rounded corners. They allow you to tailor the undertones precisely to your room’s natural lighting, shifting between warm urban hues and crisp minimalist tones. Furthermore, quality paint systems paired with low-VOC formulations maintain excellent indoor air quality, making them a clean, family-friendly choice for modern homes.
Essential Tools and Surface Preparation
Flawless decorative painting always begins with thorough prep work. Because a faux concrete finish draws the eye directly to subtle surface variations, any unintended drywall flaws, nail pops, or uneven seams will disrupt the illusion.

Before picking up your decorative tools, assemble the following essential materials:
- Heavy-duty canvas drop cloths and low-tack painter’s tape
- High-density foam rollers and standard 3/8-inch nap roller covers
- Stainless steel Venetian or curved-edge drywall trowels
- Natural sea sponges and microfiber rags
- 220-grit sanding sponges and dust-free tack cloths
- High-adhesion matte interior acrylic primer
- Premium matte interior latex paints in three coordinating gray values
- Clear acrylic glazing liquid and dead-flat protective topcoat
Surface Prep and Drywall Repair
To prepare your walls:
- Clean the Substrate: Wash the wall surface with mild water and detergent to remove oils, dust, and fingerprints. Rinse thoroughly and allow it to dry completely.
- Patch and Sand: Inspect the wall with an angled work light. Fill gouges, cracks, and dents using quality spackling or joint compound. Once dry, sand the repairs flush using 220-grit sandpaper until completely level.
- Wipe Away Dust: Use a damp microfiber cloth or tack cloth to eliminate all drywall dust particles that could ruin paint adhesion.
- Prime Uniformly: Apply a uniform layer of premium stain-blocking matte primer. Priming creates uniform porosity across patched areas and old paint, ensuring your base coat absorbs evenly across every square inch.
For complex room layouts or walls with extensive settling cracks, our team at T&Z provides expert drywall repair and professional wall painting to ensure an immaculate canvas for any specialty design.
Planning Your Faux Concrete Wall Finish Palette and Texture
Concrete is rarely a single shade of gray. Selecting the proper palette ensures the finished wall harmonizes with your flooring, cabinetry, and ambient lighting:
- Industrial Grey: Features cool, blue-slate undertones. This style pairs beautifully with exposed ductwork, black metal hardware, and bright daylight.
- Rustic Grey: Contains subtle umber, beige, and earthy undertones. Often called “greige” concrete, it softens modern spaces and complements warm hardwood flooring and leather furnishings.
- Washed Grey: A light, airy aesthetic mimicking sun-bleached cement or limestone. Perfect for Scandinavian-inspired interiors, compact bedrooms, and minimalist home offices.
Because computer screens and paint swatches often shift under different home lighting, we always recommend testing sample boards in your space. Through our comprehensive color consultation & palette selection services, we help homeowners pinpoint the exact undertones needed to bring their vision to life.
Step-by-Step Application Techniques for Faux Concrete Walls
Once your surface is primed and dry, you can begin the layering process. The key to creating authentic faux concrete lies in maintaining a wet edge and working in organic, sweeping rhythms rather than rigid geometric blocks.
Applying the Faux Concrete Wall Finish Layers
- Roll the Base Coat: Apply two thin, even coats of your mid-tone gray matte interior paint. Allow each coat to dry for at least 3 to 4 hours. This serves as the foundational body color for your wall.
- Mix Your Glazes: In separate paint trays, mix your darker charcoal tone and your lighter accent tone with acrylic glazing liquid at a 1:3 ratio (one part paint to three parts glaze). The glaze extends the open working time and creates beautiful translucency.
- Cross-Hatch Application: Working in manageable 3-foot by 3-foot sections, apply the darker glaze using random, sweeping cross-hatch strokes with a wide brush or damp sea sponge.
- Blend the Accent Tone: Immediately work small amounts of the lighter glaze into the wet dark glaze. Soften the transitions using a clean, damp microfiber cloth or blending brush, keeping the edges soft and hazy.
- Vary the Pattern: Step back every few minutes to view the wall as a whole. Keep the color distribution organic, avoiding repetitive patches or symmetrical spots.
For homeowners looking for master-crafted character, explore our full suite of artisan decorative faux finishes tailored to custom residential spaces.
Adding Depth with Trowel Texturing and Stippling
To elevate your wall from painted drywall to tactile architectural concrete, incorporate physical texture into the glaze layers:
- Sponge Stippling: Lightly dab a damp natural sea sponge dipped in your lighter glaze over random areas to simulate the open air-pocket pitting found in genuine poured concrete slabs.
- Trowel Knockdown: Hold a stainless steel trowel at a low 15-degree angle and glide it lightly across damp glaze patches. This flattens the peaks and creates subtle, polished aggregate burnish marks.
- Simulated Expansion Seams: To mimic modern concrete wall slabs or form panels, use a long level and low-tack painter’s tape to score horizontal or vertical seam lines spaced 24 to 48 inches apart, lightly shading along the taped edge before removal.
Our craftsmen specialize in advanced specialty coatings & textured painting, giving walls dimensional authenticity that catches natural sunlight with refined elegance.
Sealing and Protective Topcoats
After allowing your decorative layers to cure for at least 24 hours, applying a protective topcoat safeguards your craftsmanship against scuffs, dust, and moisture:
- Use a non-yellowing, water-based dead-flat or ultra-matte acrylic clear sealer.
- Avoid high-gloss or semi-gloss finishes, which produce glare that detracts from the raw, organic look of concrete.
- Apply two thin, even coats using a low-lint microfiber roller, allowing 2 to 3 hours of drying time between applications.
- A quality matte topcoat ensures the wall is washable and scrubbable, protecting high-traffic zones against daily wear while preserving its velvety masonry appearance.
Design Integration and Maintenance for Interior Spaces
A concrete wall finish introduces architectural gravity to any interior, balancing industrial minimalism with organic warmth.
Best Rooms and Accent Applications
- Living Room Fireplace Surrounds: A faux concrete finish brings a modern, monolithic presence to fireplace bump-outs and media walls without requiring heavy structural masonry reinforcement.
- Dining Room Accent Walls: Paired with warm pendant lighting and natural wood furnishings, a textured gray backdrop creates an intimate, upscale gallery feel.
- Primary Bedroom Headboard Walls: Using a soft Washed Grey finish behind the bed creates a calming, textural retreat that anchors modern linens and neutral decor.
- Home Offices & Commercial Lobbies: Clean industrial textures convey modern innovation and professionalism in executive workspaces and boutique commercial entryways.
Discover creative ways to frame your living spaces through our professional accent walls & decorative painting integration solutions.
Cleaning, Care, and Durability
Maintaining a sealed faux concrete wall is remarkably straightforward:
- Routine Dusting: Use a dry microfiber duster or vacuum with a soft brush attachment every few weeks to prevent surface dust accumulation.
- Spot Cleaning: For smudges or handprints, wipe gently with a soft sponge dampened with warm water and a drop of mild, pH-neutral liquid dish soap.
- Avoid Harsh Chemicals: Never use abrasive scrubbing pads, ammonia-based sprays, or bleach, as these can strip the protective matte clear coat.
- Touch-Ups: Keep small, labeled jars of your base paint and glaze mixes stored in a climate-controlled area for effortless touch-ups if the wall ever receives a heavy impact scuff.
Frequently Asked Questions About Faux Concrete Finishes
Can faux concrete paint techniques be used in high-moisture bathrooms?
Yes, faux concrete paint finishes can be successfully applied in powder rooms and standard bathrooms. In spaces with elevated humidity, the key is using a high-adhesion primer followed by multiple layers of non-porous, moisture-resistant dead-flat acrylic topcoats. Ensure the bathroom has adequate ventilation to allow the paint and sealers to cure fully without moisture trapping. However, avoid applying paint finishes inside direct wet zones, such as the interior of shower stalls.
How does faux concrete paint compare to other decorative wall treatments?
Paint-based faux concrete techniques offer a lightweight alternative to authentic poured concrete slabs, heavy precast masonry, or stone veneers, which can require substantial structural modifications. While prefabricated panels introduce added material shipping and fastening steps, multi-layer paint finishes rely on standard paint materials, professional glazes, and skilled labor. This makes artisan paint finishing a versatile way to transform an interior with realistic concrete character and minimal structural impact.
What is the best way to clean and maintain a faux concrete wall?
The best approach is gentle, routine maintenance using a soft microfiber cloth or duster. When deeper cleaning is necessary, use a soft sponge lightly dampened with warm water and a mild detergent. Because a sealed faux finish resists moisture and stains, aggressive scrubbing is unnecessary. Periodically inspect high-traffic corners and recoat with a thin layer of matte protective sealer every few years if the area experiences heavy commercial use.
Conclusion
A custom faux concrete finish brings architectural drama, industrial character, and timeless urban sophistication into any residential or commercial setting. By combining quality primers, nuanced color blending, and careful trowel texturing, you can transform plain drywall into a striking focal point that captures the tactile beauty of authentic masonry.
At T&Z Interior And Exterior Painting, we take pride in delivering pristine craftsmanship, clean job sites, and personalized service across every project. With more than 15 years of industry experience, our licensed and insured painting specialists hold a 5.0 Google Reviews rating built on unwavering attention to detail and long-lasting results.
Whether you are updating a single feature wall or planning a comprehensive interior transformation, our team is ready to assist. Explore our full range of interior painting services throughout Lombard, Itasca, Addison, Glen Ellyn, Oak Brook, and surrounding towns to bring durable, artisan finishes to your home today.