
Which Kitchen Cabinet Paint Holds Up Best?
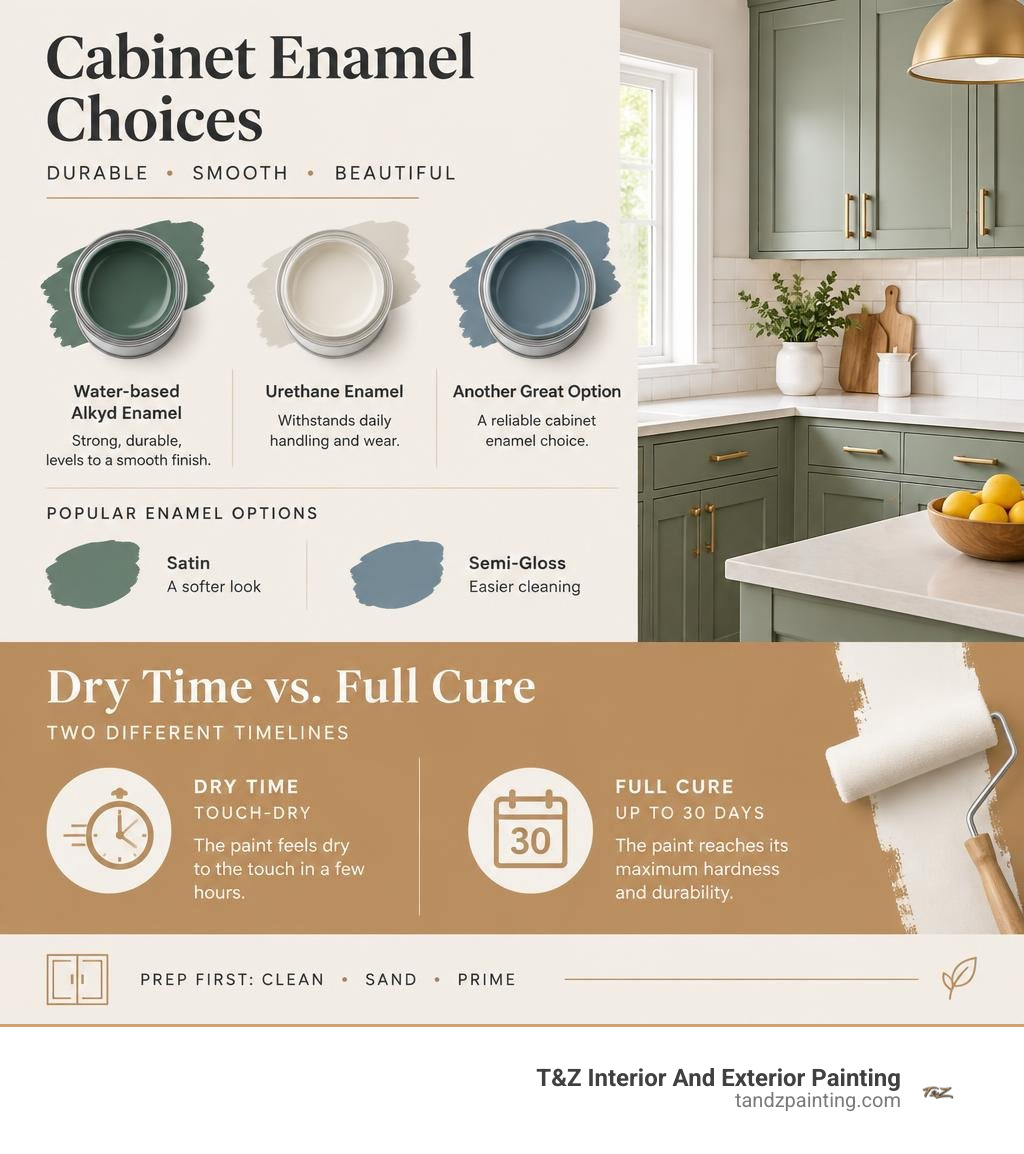
Choose a cabinet-grade enamel, not standard wall paint. Water-based alkyd and urethane enamels are strong choices because they level into a smooth finish and stand up to daily handling. Sherwin-Williams Emerald Urethane Trim Enamel and Benjamin Moore Advance are two options to compare; BEHR Cabinet & Trim Enamel is another. Pick satin for a softer look or semi-gloss for easier cleaning. Whichever paint you choose, clean, sand, and prime the cabinets first.
I’m Tomasz Niemotko of T&Z Interior And Exterior Painting. For more than 13 years, our team has handled kitchen cabinet paint and refinishing projects for homeowners in Lombard, Itasca, Addison, Glen Ellyn, Oak Brook, and surrounding towns.
Related content about kitchen cabinet paint:
Types of Kitchen Cabinet Paint: Comparing Durability and Performance
Selecting the right chemistry is the foundation of any long-lasting cabinet transformation. Kitchen cabinetry experiences higher levels of physical contact, moisture, airborne grease, and temperature fluctuation than any other painted surface in your home. Using standard latex wall paint on cabinets is a recipe for premature failure; soft latex formulations scratch, scuff, and break down around knobs and pulls within a single year of daily use.
When reviewing the guide to selecting cabinet paint formulas, three main categories emerge: waterborne alkyds, traditional oil-based enamels, and acrylic latex trim paints.
- Water-Based Alkyd Hybrids: These modern formulations combine the smooth leveling, open work time, and rock-hard curing of traditional oil paints with the low VOC content and easy water cleanup of acrylics. They do not yellow over time, making them the industry standard for residential cabinetry.
- Urethane-Modified Acrylic Enamels: Formulated with urethane resin technology, these coatings provide exceptional hardness and blocking resistance (preventing cabinet doors from sticking to frames). They cure to an ultra-tough, factory-grade film that withstands repetitive scrubbing.
- Traditional Oil-Based Enamels: While historically favored for their hard shell and self-leveling qualities, traditional oils dry very slowly, emit strong fumes, require mineral spirits for cleanup, and tend to amber or yellow in kitchens with limited natural sunlight.
- Standard Latex Trim Paints: While flexible and quick-drying, standard acrylic latex paints remain too soft for high-wear cabinet edges, often showing heavy wear within 3 to 5 years compared to 7 to 10 years for specialized cabinet enamels.
| Paint Formula Type | Hardness & Durability | Full Cure Window | VOC Level | Cleanability & Resistance |
|---|---|---|---|---|
| Waterborne Alkyd Hybrid | High (Hard furniture film) | 14–30 Days | Low to Moderate | High (Resists household grease) |
| Urethane Acrylic Enamel | Superior (Scratch resistant) | 7–14 Days | Low | Superior (Scrub-rated) |
| Traditional Oil-Based | Superior (Hard shell) | 14–30 Days | High (Strong odor) | High (Prone to yellowing) |
| Standard Acrylic Latex | Moderate (Flexible/soft) | 14–21 Days | Very Low | Moderate (Prone to burnishing) |
Top-Rated Kitchen Cabinet Paint Brands on the Market
Investing in premium, commercial-grade architectural coatings guarantees better opacity, smoother leveling, and greater film resilience. Several standout products lead the industry for homeowners and professional finishers:
- Sherwin-Williams Emerald Urethane Trim Enamel: A water-based urethane-modified alkyd enamel that delivers exceptional resistance to yellowing and blocking. It flows out uniformly, resists sagging on vertical profiles, and dries to the touch in just a few hours. It is widely considered one of the most resilient finishes available for active households.
- Benjamin Moore Advance: A waterborne alkyd paint that provides extended open time, allowing brushstrokes and roller stipple to melt away into a smooth, porcelain-like finish. While it requires approximately 16 hours between coats, its cured hardness and stain-blocking capabilities are top tier.
- BEHR PREMIUM Cabinet & Trim Interior Semi-Gloss Enamel: An acrylic enamel that dries quickly and forms a mildew-resistant, non-stick finish ideal for moisture-rich kitchen environments.
When following expert steps for a factory finish, look for formulations that meet or exceed Kitchen Cabinet Manufacturers Association (KCMA) durability benchmarks for resistance to heat, steam, household chemicals, and impact.
Choosing the Right Sheen for Kitchen Cabinets
Sheen selection affects not just the visual ambiance of your cooking space, but also its practical maintenance and light reflectance. Balancing aesthetic goals with wipeability ensures your cabinets stay pristine.
- Satin Finish: Satin provides a soft, velvety luster with low glare. It excels at concealing subtle wood grain texture, minor substrate imperfections, and minor dings while offering enough moisture resistance for everyday wipe-downs.
- Semi-Gloss Finish: The traditional favorite for kitchen cabinetry and millwork. Semi-gloss reflects more light, highlighting architectural door profiles and providing a slick, non-porous surface that repels cooking grease and food splatters. To find the right sheen level for your space, explore selecting durable semi-gloss and satin sheens.
- High-Gloss Finish: Delivers a modern, mirror-like aesthetic that is effortless to clean. However, high gloss demands a perfectly smooth substrate, as it reflects every fingerprint, scratch, and minor surface flaw.
- Matte or Flat Finishes: Matte creates a trendy, contemporary designer look, but its porous surface tends to trap oils and burnish (develop shiny spots) when scrubbed. It is rarely recommended for active kitchen cabinets unless sealed with a specialized conversion clear coat.
Essential Preparation and Priming for Maximum Adhesion
A flawless paint job is only as good as the foundation beneath it. Prep work accounts for the vast majority of project success; cutting corners during surface cleaning or sanding is the leading cause of peeling, bubbling, and chipping.
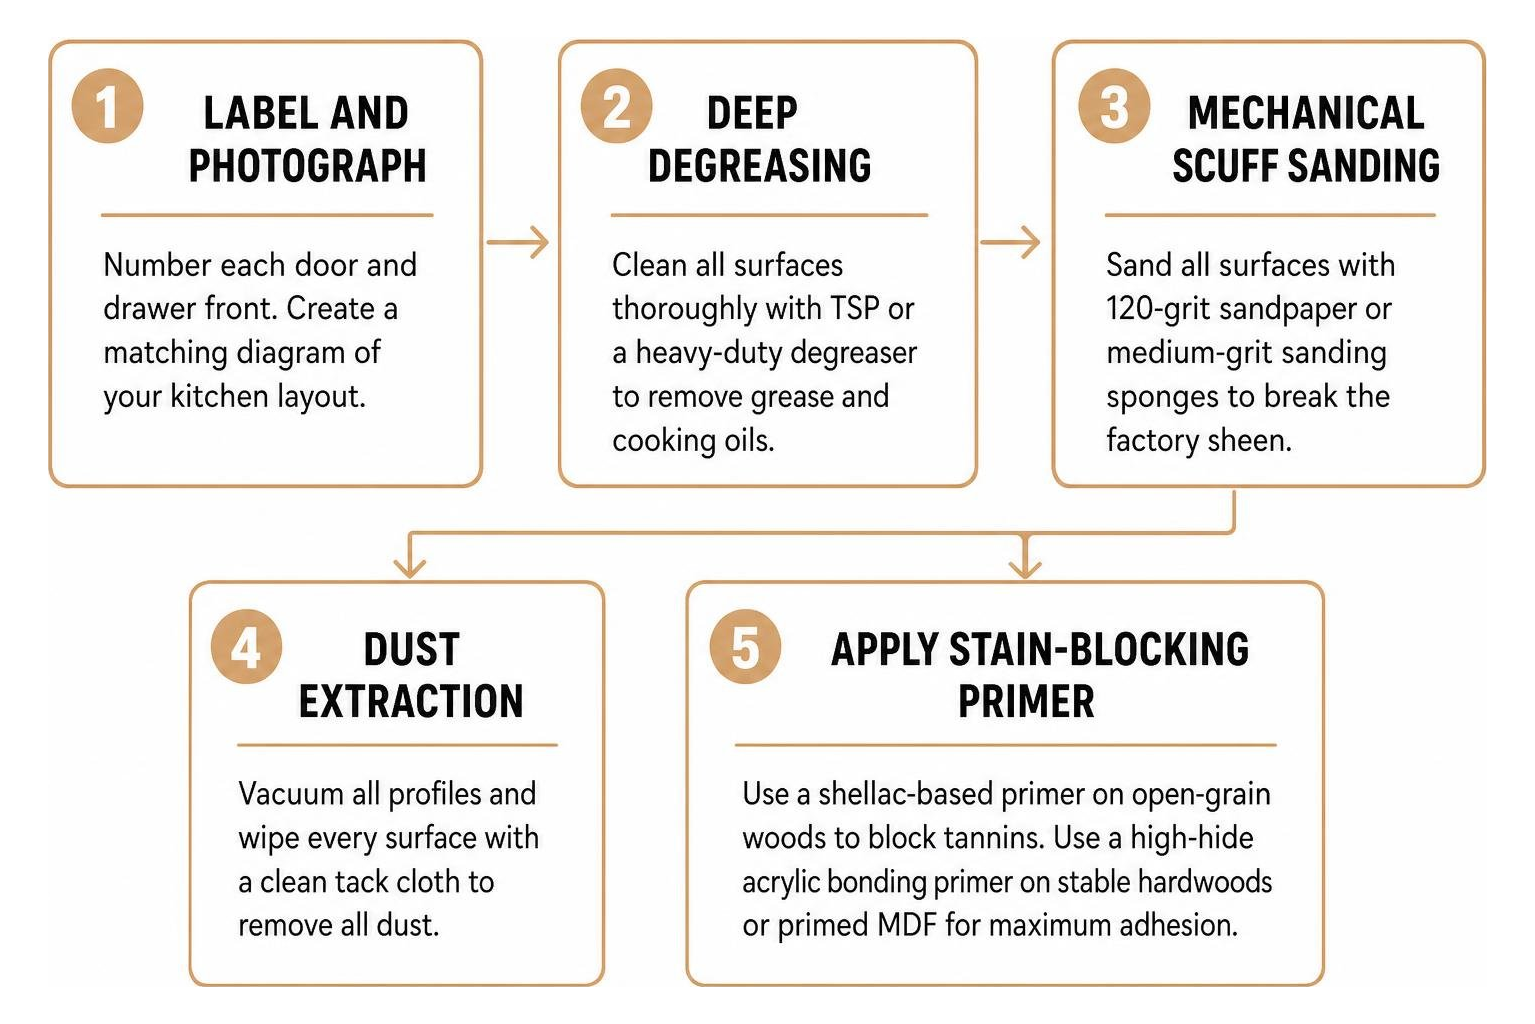
- Label and Photograph Every Component: Before removing a single hinge, number each door and drawer front using numbered tape inside the hinge pocket, matching it to an exact diagram of your kitchen layout. This prevents misaligned doors during reassembly.
- Deep Degreasing: Kitchen cabinets accumulate microscopic grease and cooking oils, particularly within cooking zones near ranges and vent hoods. Clean every surface thoroughly with trisodium phosphate (TSP) or a heavy-duty degreaser. Standard soap leaves residues that prevent primer adhesion.
- Mechanical Scuff Sanding: Once dry, sand all surfaces with 120-grit sandpaper or medium-grit sanding sponges. The objective is not stripping to bare wood, but breaking the factory sheen and creating a mechanical “profile” for the primer to grip.
- Dust Extraction: Vacuum all profiles and wipe every square inch with a clean tack cloth to eliminate loose dust.
- Applying Stain-Blocking Primer: Apply a dedicated bonding primer. For open-grain woods such as oak, cherry, or mahogany, use a shellac-based primer (such as Zinsser B-I-N) to permanently seal tannins and prevent wood oils from bleeding through the topcoat. For stable hardwoods or primed MDF, high-hide acrylic bonding primers perform exceptionally well. Learn more about choosing proper stain-blocking primers for wood and MDF.
Special Substrates: Painting Laminate, Veneer, and Previously Painted Boxes
Not all cabinetry is solid wood. Non-porous surfaces like laminate, melamine, and wood veneers require specialized bonding techniques:
- Laminate and Melamine: Because these synthetic surfaces lack pores, normal primers will slide off. Clean thoroughly, scuff sand with 120-grit paper to abrade the plastic resin, and apply a specialized bonding primer formulated with adhesion promoters. Discover dedicated methods for handling laminate and veneer surfaces to ensure long-term bonding.
- Wood Veneer: Inspect veneer edges for delamination or bubbling. Re-adhere loose veneer with wood glue before light sanding, taking care not to sand through thin surface layers.
- Previously Painted Cabinets: Test existing coatings for stability. If the previous paint is failing, scrape away loose material, feather out the edges with 220-grit paper, spot-prime bare spots, and apply a universal bonding sealer across the entire surface.
How to Apply Kitchen Cabinet Paint for a Smooth, Factory Finish
Achieving a clean, factory-grade finish requires careful application technique and controlled environment management.
- Brush-and-Roller Method: Use a 2-inch to 2.5-inch fine-filament angled sash brush for recessed profiles, trim, and frame corners. Immediately follow with a 4-inch high-density foam or micro-plush roller on flat panels, rolling in the natural direction of the wood grain. Maintain a wet edge and avoid overworking the paint as it begins to level.
- Sprayer Application: For the smoothest possible finish, professional HVLP (High Volume Low Pressure) or airless spray systems apply atomized micro-droplets that lay down without brush texture or stipple. Review architectural guidance on cabinet refinishing for insights into spray setup, masking, and ventilation.
- Thin, Consistent Coats: Always apply two to three thin, uniform coats rather than one heavy application. Heavy coats sag, run, and trap solvents beneath the surface skin, leading to soft paint that easily dings.
- Inter-Coat Sanding: Allow each coat to dry completely according to manufacturer instructions. Sand lightly with 220-grit to 320-grit sandpaper between coats to eliminate airborne dust nibs and lap lines, wiping clean with a tack cloth before applying the next layer.
Curing and Long-Term Maintenance
Understanding the difference between drying time and curing time protects your newly finished cabinets from accidental damage. While modern enamels may dry to the touch in 2 to 8 hours, they require between 14 and 30 days to reach full chemical polymerization and maximum hardness.
- Reinstallation Care: Rehang doors carefully after 48 hours of drying, handling only the edges.
- Protective Bumpers: Install clear silicone soft-close bumpers on the interior corners of all doors and drawer faces to eliminate point-impact contact against the face frames.
- Gentle Cleaning: Avoid abrasive scrubbers, harsh chemical degreasers, or abrasive sponges during the initial 30-day cure window. Once fully cured, clean surfaces using warm water, a mild pH-neutral dish soap, and a soft microfiber cloth.
With proper preparation, premium materials, and careful maintenance, a professionally painted kitchen can deliver 7 to 10 years of beautiful, durable performance.
Frequently Asked Questions About Kitchen Cabinet Paint
Can I use regular interior wall paint on kitchen cabinets?
No. Standard interior latex wall paint lacks the resin density, blocking resistance, and hard-curing polymers needed for high-touch surfaces. Standard wall paint remains soft and flexible, which causes it to absorb skin oils, chip around handles, and stick to cabinet face frames. Understanding why dedicated cabinet enamels prevent sticky doors will save you from peeling doors and repeated touch-ups.
How long does cabinet paint take to fully cure before heavy use?
While cabinet enamels are dry to the touch within a few hours and safe for careful reassembly after 24 to 48 hours, a full chemical cure takes between 7 and 30 days depending on the formula, room temperature, and ambient humidity. Maintain stable indoor climate control (ideally 65°F to 75°F with moderate humidity) to facilitate proper solvent evaporation and resin cross-linking.
What is the return on investment of painting cabinets?
Refinishing and painting sound cabinetry offers one of the highest returns on investment in residential home improvement. It preserves high-quality existing hardwood cabinet boxes, modernizes dated aesthetics, and protects wood surfaces for 7 to 10 years without the disruption and structural waste of a complete kitchen tear-out.
Conclusion
Transforming your kitchen with the right cabinet paint delivers a durable, showroom-quality focal point that stands up to years of daily family life. Achieving a durable finish requires meticulous degreasing, proper mechanical sanding, stain-blocking primers, and high-performance hybrid enamels applied with precision.
At T&Z Interior And Exterior Painting, our licensed and insured craftsmen bring more than 15 years of hands-on experience and a 5.0 Google Reviews rating to every home. We specialize in residential interior and exterior painting, commercial painting, drywall repair, textured finishes, specialty coatings, and furniture-grade cabinet refinishing. We proudly serve homeowners across Lombard, Itasca, Addison, Glen Ellyn, Oak Brook, and surrounding communities.
Ready to elevate your kitchen with flawless, long-lasting color? Contact our expert team today to schedule your consultation and explore our professional cabinet painting services.