
How to Spray Paint Metal Cabinets for a Smooth Finish
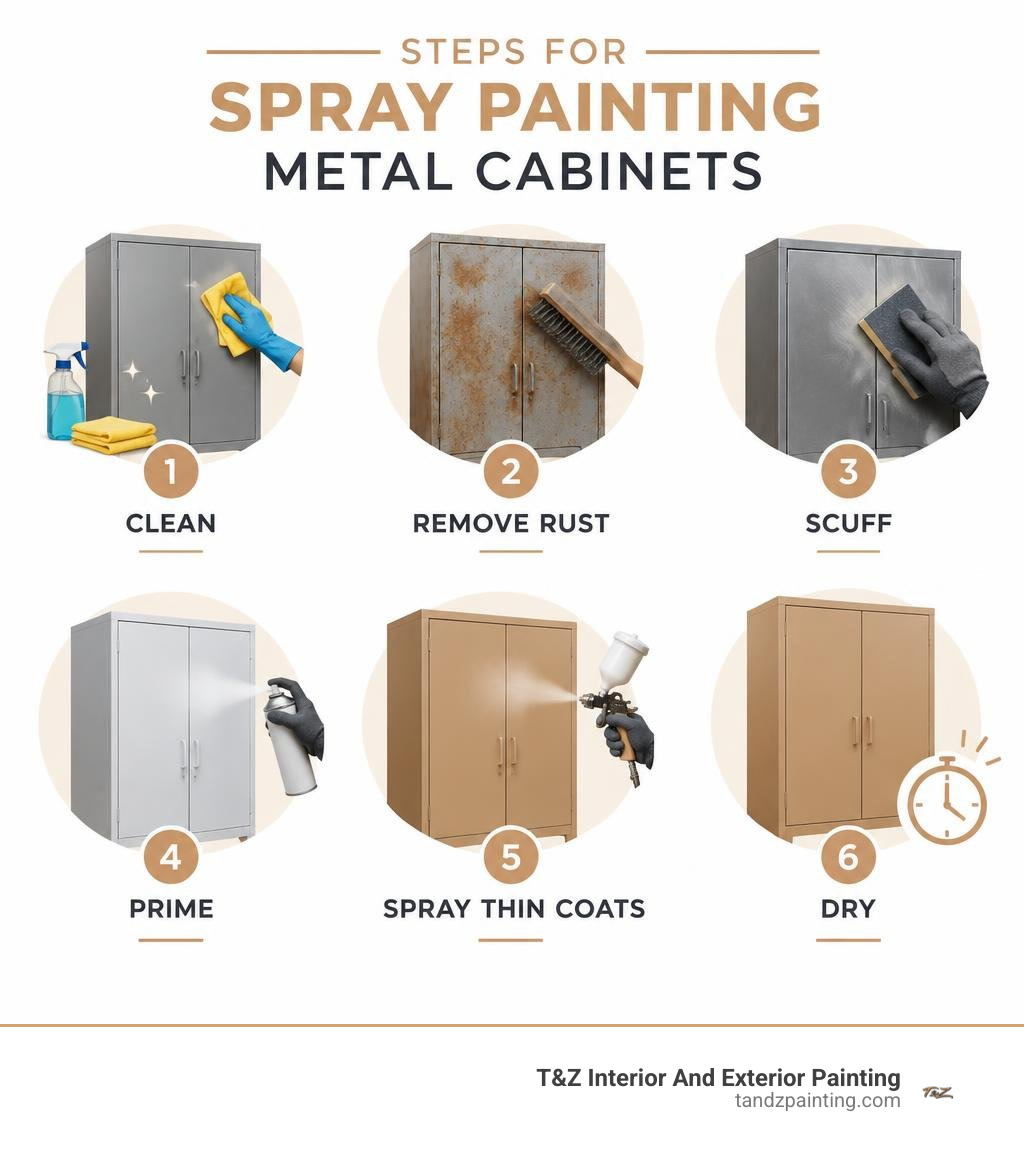
For spray painting metal cabinets, remove the drawers and hardware, clean off grease, and sand away loose paint and rust. Scuff the remaining finish, then prime exposed metal with a suitable metal primer. Spray two or more thin, overlapping coats, following the paint label for time between coats. Let the cabinet dry for at least 24 hours before putting it back to use.
I’m Tomasz Niemotko, owner and founder of T&Z Interior And Exterior Painting, a licensed and insured painting contractor founded in 2009 and based at 1101 S Columbine Ave, Lombard, IL 60148. I draw on over 15 years of cabinet and furniture refinishing and spray painting experience to guide homeowners through spray painting metal cabinets, starting with the prep that helps the finish last.
Key spray painting metal cabinets vocabulary:
Essential Tools and Safety Setup for Metal Cabinet Refinishing
Achieving a clean, durable coat on metal requires proper safety gear and workspace preparation before opening any paint cans. Spraying atomizes paint into fine airborne mists and releases volatile organic compounds (VOCs). Following established guidelines from major home publications such as This Old House ensures you protect your health while keeping airborne overspray off surrounding surfaces.
Personal Protective Equipment and Workspace Prep
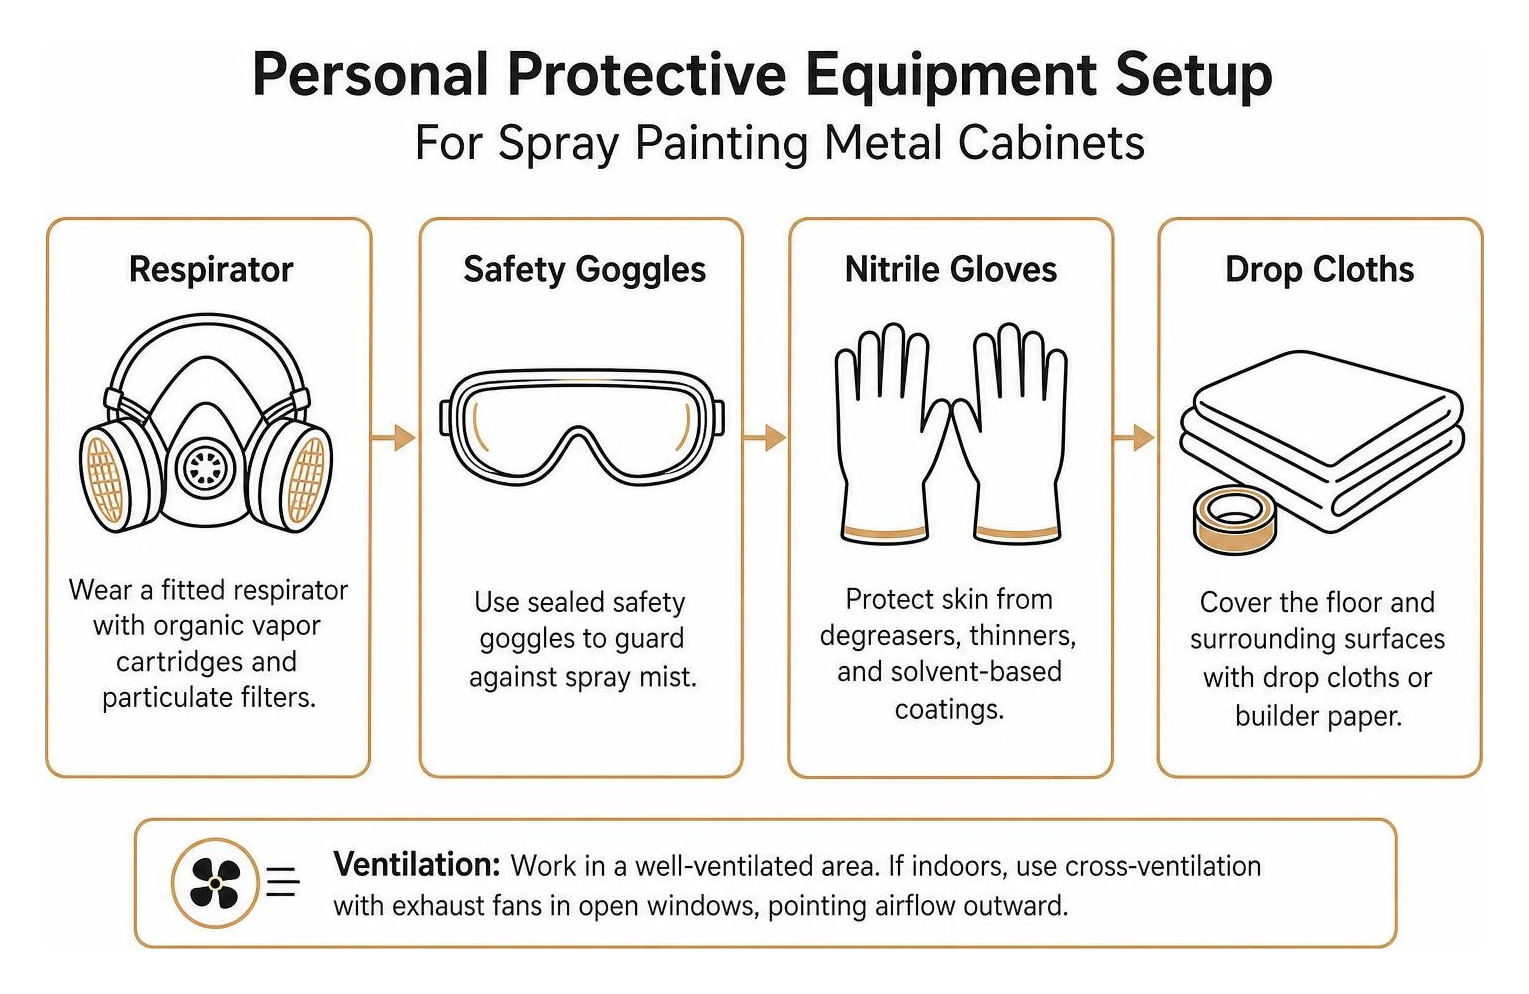
Working with solvent-based coatings and fine metal dust requires reliable protective gear:
- Respirator Mask: Wear a fitted respirator equipped with organic vapor cartridges and particulate filters rather than a standard dust mask to prevent VOC inhalation.
- Eye Protection: Use sealed safety goggles to guard against floating spray mist.
- Nitrile Gloves: Protect skin from aggressive degreasers, paint thinners, and solvent-borne coatings.
- Protective Clothing: Wear long sleeves and pants to prevent skin contact with overspray.
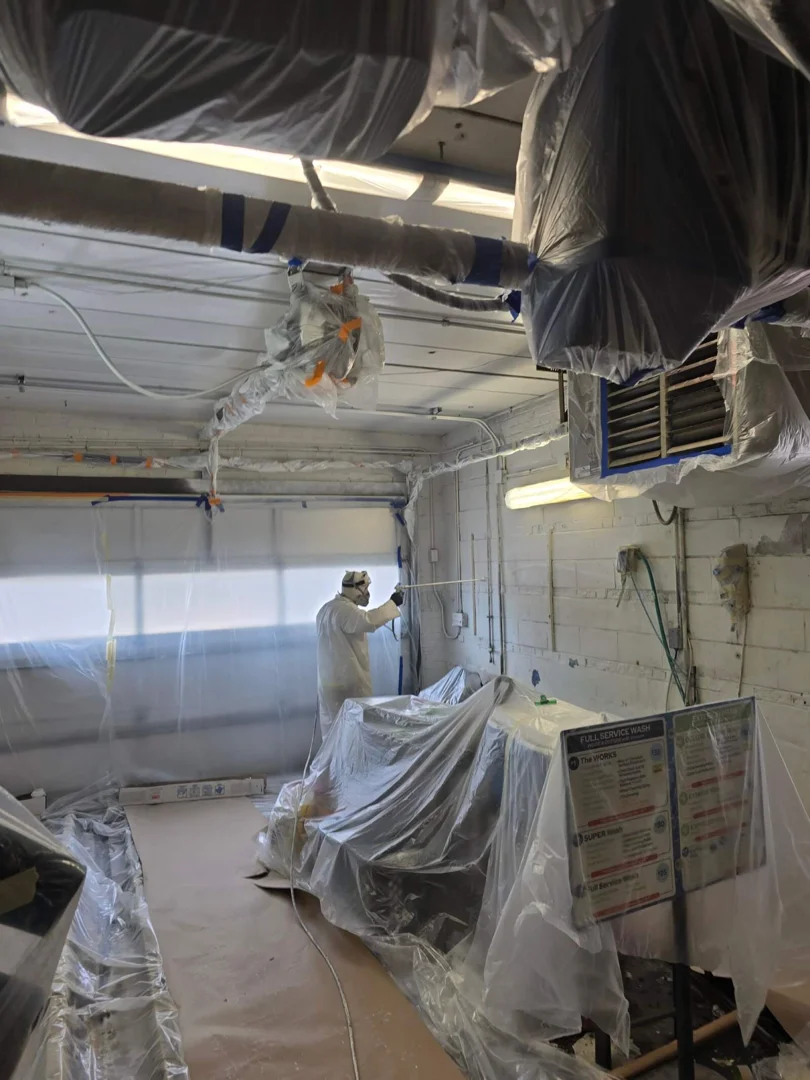
Set up your spray station in a well-ventilated area such as an open garage, workshop, or outdoor space shielded from direct wind. Protect the floor and adjacent walls with heavy drop cloths or builder paper, securing edges with tape to prevent shifting from air currents. If working indoors, establish active cross-ventilation by placing exhaust fans in open windows, pointing airflow outward.
Selecting Primers, Paints, and Sanding Abrasives
Choosing the right paint system determines how well your finish resists chipping, peeling, and corrosion. When selecting kitchen cabinet primers, evaluate whether the surface has active rust or bare steel. Bare, rust-free sheet metal requires a dedicated clean metal primer or a self-etching primer to establish a solid chemical bond. If residual rust pitting remains after prep, apply a rust-inhibitive primer containing iron oxide or zinc compounds.
For the color coats, oil-based alkyd enamels and specialized direct-to-metal (DTM) paints offer high durability, hard cure strength, and superior adhesion compared to standard latex paints. Prepare abrasives across two main grades: 120-grit sandpaper for knocking down rust scale and feathering chipped paint edges, and 220-grit sandpaper or fine scuff pads for creating a mechanical profile on sound existing coatings.
| Feature | Aerosol Spray Cans | Professional HVLP Sprayers |
|---|---|---|
| Ideal Project Size | Single filing cabinets, small utility boxes, hardware | Multi-cabinet suites, kitchen banks, large lockers |
| Film Thickness | Thin coats; requires 3 to 4 passes for heavy durability | High build; adjustable fluid and air control |
| Material Control | Fixed pressure and spray pattern width | Adjustable fan width, pressure, and volume |
| Setup & Cleanup | Minimal setup; dispose of or clear nozzle inverted | Requires fluid line flush, needle cleaning, and breakdown |
| Finish Uniformity | Smooth with good technique; prone to pressure drop | Factory-grade atomization with zero brush marks |
Comprehensive Surface Preparation and Rust Removal
Preparation accounts for the vast majority of the work on any metal refinishing project. Unlike porous wood, slick metal panels lack natural grain, making mechanical and chemical prep essential for proper bonding according to standard practices for spray painting metal.
Hardware Removal, Degreasing, and Cleaning
Begin by fully disassembling the cabinet. Pull out all drawers, remove drawer pulls, label holders, lock cylinders, and unscrew hinges. Painting hardware separately prevents paint bridge cracking around moving components.
Clean all surfaces using a heavy-duty degreaser such as trisodium phosphate (TSP) or Simple Green to dissolve hand oils, grease, and grime. Metal cabinets in shops or kitchens collect stubborn films that cause fish-eyes and peeling if painted over.
After washing with a degreaser, rinse with clean water and dry thoroughly with microfiber cloths. Finish cleaning using the professional two-cloth solvent wipe method:
- Saturate the first cloth with mineral spirits or paint thinner and wipe a 2×2 foot section to dissolve remaining oils.
- Immediately follow with a clean, dry cloth to wipe away the solvent and dissolved contaminants before they evaporate back onto the sheet metal.
Treating Surface Rust and Sanding Existing Coatings
Inspect the metal for oxidation and flaking finish. Use a stiff wire brush or a drill-mounted wire wheel to knock loose scale down to solid metal. Treat stubborn rust spots with a liquid rust dissolver, allowing it to dwell for 5 to 10 minutes without drying out, then wipe it clean and let the panel dry.
For existing painted surfaces in sound condition, stripping to bare metal is not required. Sand the existing finish using 220-grit sandpaper or a medium-grit sanding block to knock down factory sheen and provide mechanical grip. If paint has chipped, feather the edges smooth using 120-grit sandpaper stepping up to 220-grit so the transition line does not show through the new topcoat. Wipe away all sanding dust completely.
(Note: If working on vintage metal cabinetry manufactured prior to 1978, test the existing coating with a lead test kit before dry sanding or wire brushing to ensure safe handling.)
Best Practices for Spray Painting Metal Cabinets
Applying paint via spray provides a smooth, factory-like appearance when following established application guidelines from major home publications such as The Spruce.
Monitor environmental conditions before spraying. The optimal temperature window is between 45°F and 80°F, with relative humidity below 70 percent. Spraying in direct sunlight heats the metal surface too quickly, causing the paint to dry before leveling, which results in orange peel textures or dry spray. High humidity slows solvent evaporation and can cause clouding, sagging, or poor curing.
Primer Application and Tack Coats
Once prepped, apply a rust-inhibiting primer to all bare metal and sanded repair areas. For complex metal surfaces, our spray painting services guide highlights the advantage of applying an initial tack coat.
A tack coat is an ultra-light, misty pass applied across the metal panel. Allow this light mist to flash off for roughly 3 to 5 minutes until it becomes slightly tacky. This provides an anchoring surface that prevents subsequent full primer coats from running or sagging on slick vertical steel walls. Apply one to two full coats of primer, allowing 20 to 30 minutes of dry time between coats.
Proven Techniques for Spray Painting Metal Cabinets
Achieving a uniform, streak-free surface requires consistent spray mechanics:
- Can Agitation: Shake aerosol spray cans for at least two minutes after hearing the internal mixing ball rattle to ensure pigments and resins are evenly suspended.
- Spray Distance: Maintain a consistent distance of 10 to 16 inches from the cabinet surface throughout the entire pass.
- Arm Motion: Keep the can perpendicular to the surface. Sweep your entire arm across the panel rather than pivoting your wrist, which causes thin spots on the edges and heavy buildup in the center.
- Trigger Timing: Start spraying an inch off the edge of the cabinet, sweep smoothly across the panel, and release the spray nozzle only after passing the opposite edge.
- Overlap: Overlap each previous stroke by approximately 33 percent (one-third) to build uniform film depth.
- Coat Thickness: Apply two to three thin, light coats spaced 5 to 10 minutes apart rather than a single heavy coat. Laying cabinets or drawer faces flat on horizontal stands minimizes gravitational sagging and runs compared to spraying versus hand painting cabinets on vertical planes.
Curing Times, Protective Clear Coats, and Reassembly
Handling freshly painted metal too soon is a common cause of ruined finishes. While aerosol enamels can dry to the touch in 20 to 30 minutes, full chemical curing requires significantly longer.
Proper Drying Windows and Clear Coat Protection
Allow the final color coat to dry for at least 24 hours before handling. Oil-based enamels and direct-to-metal urethane coatings undergo a chemical cure that takes up to 7 to 14 days to achieve maximum hardness.
For high-touch utility storage or tool cabinets, apply a clear protective topcoat. A semi-gloss or satin UV-resistant enamel clear coat seals the pigment, shields against scratch marks, and makes routine cleaning with mild soap and water straightforward without dulling the base color.
Common Mistakes to Avoid When Spray Painting Metal Cabinets
Review our comprehensive cabinet painting guide principles and avoid these frequent application pitfalls:
- Spraying Heavy Coats: Applying too much material at once causes runs, wrinkles, and extended soft-cure times.
- Ignoring High Humidity: Spraying when humidity exceeds 70 percent traps moisture in the curing film, leading to premature flaking and lifting.
- Nozzle Clogging: Invert aerosol cans after spraying and press the nozzle for two seconds until clear propellant emerges to prevent nozzle clogging.
- Overtightening Hardware Too Early: Installing pulls and tightening mounting screws before the 24-hour mark can crush soft paint and cause peeling around handle bases.
Frequently Asked Questions
Do I need to use primer before spray painting metal cabinets?
Yes, using a primer is essential when working with bare, rusted, or heavily scuffed metal. A rust-inhibiting clean metal primer or self-etching primer creates the necessary chemical bond on slick sheet metal that topcoats cannot achieve alone. For previously painted cabinets in sound condition, a direct-to-metal (DTM) paint can be applied after thorough cleaning and scuff sanding.
Can I spray paint over existing paint on a metal cabinet?
You can spray paint over existing paint if the underlying finish is intact, smooth, and firmly adhered. Scrape away any peeling paint, feather rough edges with 120-grit sandpaper, and scuff the entire surface with 220-grit sandpaper to remove gloss. Clean with a degreaser and solvent wipe before applying your topcoats.
How do I avoid drips and runs on smooth metal surfaces?
To prevent drips, hold the spray nozzle 10 to 16 inches from the surface, keep the can in constant motion, and start and end each pass off the edge of the cabinet. Apply multiple light coats rather than heavy single layers, and place removable cabinet doors and drawers horizontally flat on sawhorses while painting.
Conclusion
Refinishing metal storage units, shop fixtures, and office furniture with spray paint provides a durable, factory-smooth finish that protects against rust and wear. Success relies on systematic surface degreasing, proper rust conversion, correct abrasives, and controlled spray application.
For homeowners throughout Lombard, Glen Ellyn, Villa Park, Oak Brook, Oakbrook Terrace, Downers Grove, Wheaton, Elmhurst, Addison, Itasca, Roselle, Bloomingdale, Carol Stream, Wood Dale, Westmont, Bensenville, Berkeley, Hillside, Schiller Park, Glendale Heights, Schaumburg, and Chicago seeking professional results without the hassle, our team is ready to help.
T&Z Interior And Exterior Painting brings over 15 years of industry experience to residential and commercial painting projects. Founded in 2009 by Tomasz Niemotko, we are a licensed and insured, BBB-accredited painting contractor holding a 5.0 Google rating with 85+ reviews. All our painting work is backed by a dependable 2-year warranty.
Explore our professional spray painting services to see how we can revitalize your cabinets. Contact us today to request a free estimate on tandzpainting.com or call (224) 240-0054 to discuss your upcoming project.