
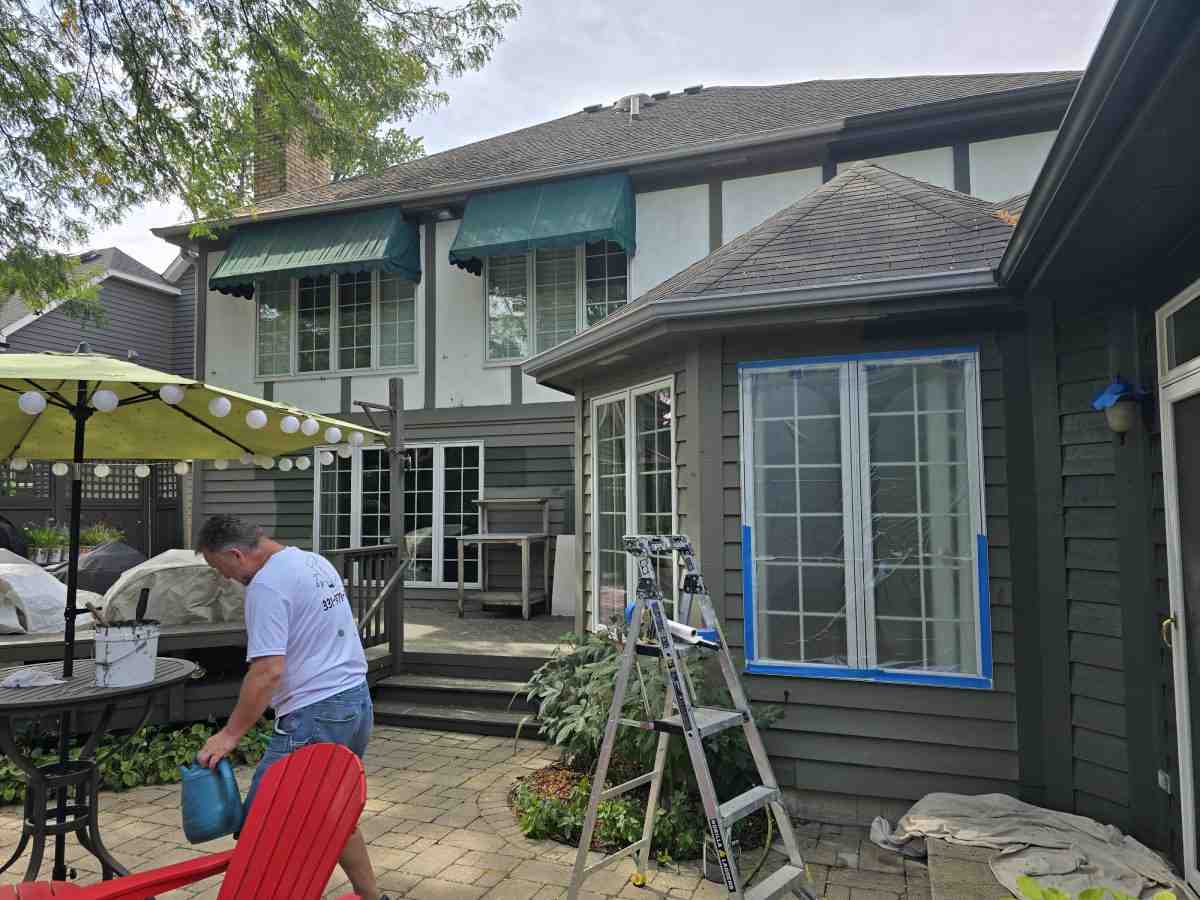
How to Paint Your Home’s Exterior for a Lasting Finish
For a paint job that lasts, start with the surface, not the color. Wash the siding, remove loose paint, repair damage, and let everything dry. Prime bare or problem areas, then apply exterior paint suited to your siding. Work from top to bottom in mild, dry weather, and follow the paint label for time between coats.
I’m Tomasz Niemotko, owner and founder of T&Z Interior And Exterior Painting, a licensed and insured contractor founded in 2009 and based at 1101 S Columbine Ave, Lombard, IL 60148. With over 15 years of experience in residential exterior projects, I’ve seen how good prep helps a fresh finish hold up.
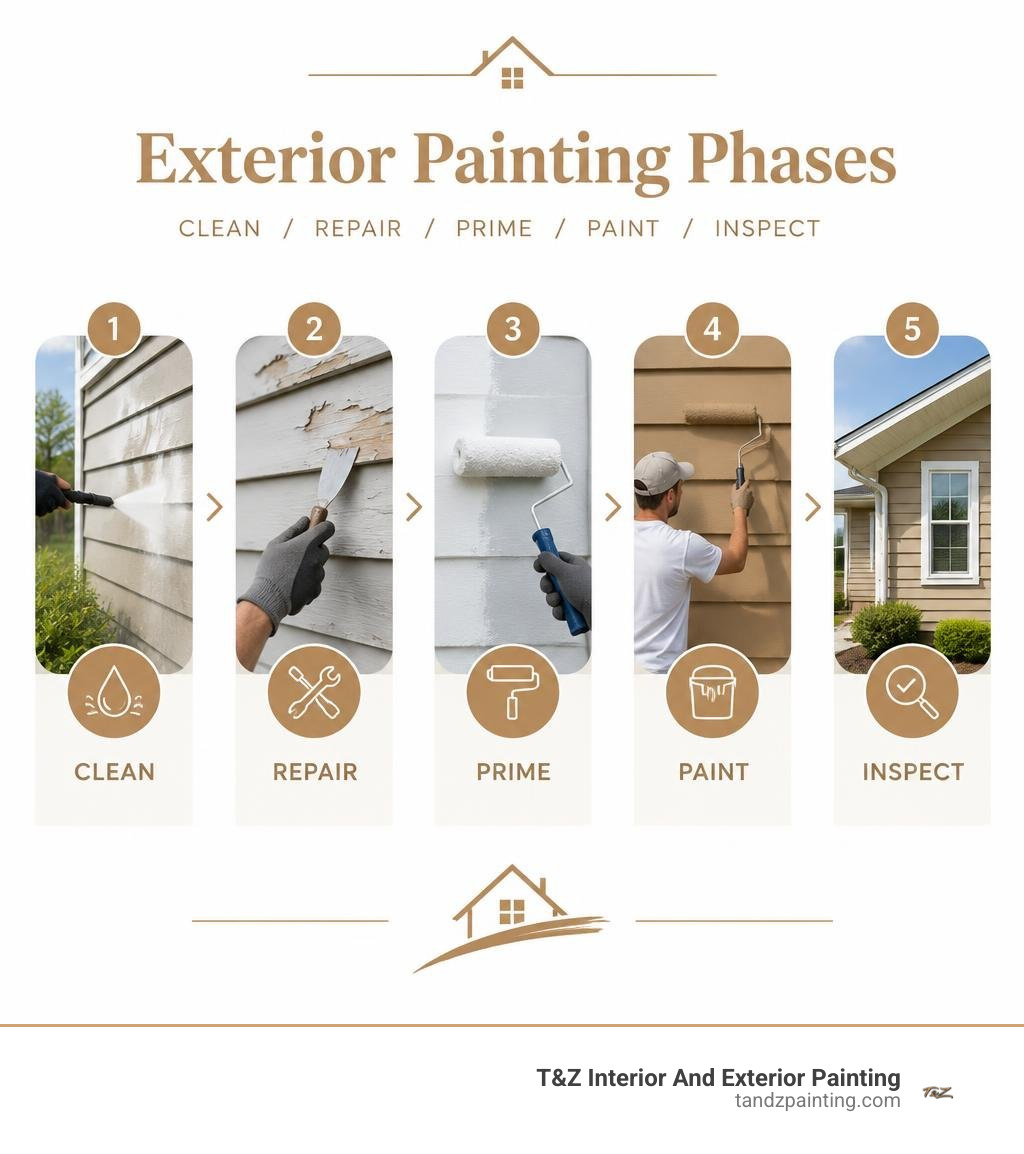
Planning a durable project for home painting outside requires understanding your siding materials, choosing weather-resistant coatings, and following proven application methods. Explore our resources on exterior home painting, learning the best way to paint outside of house surfaces, and selecting the right wall paint outside the house.
Selecting Colors, Finishes, and Coatings for Siding
A successful exterior update begins with thoughtful color planning. Trending palettes range from classic modern farmhouses featuring crisp off-whites and dark bronze trim to rich, moody charcoal and deep navy tones. If you prefer timeless undertones, explore neutral exterior paint ideas that provide warmth without overwhelming the architecture.
Homeowners interested in traditional balance often incorporate Vastu Shastra principles. These guidelines favor earthy tones like warm beige, soft yellow, light brown, and gentle greens while avoiding stark, dark shades that absorb excessive solar heat. Coordinating your siding with fixed masonry and natural surroundings creates a unified look that enhances neighborhood appeal.
Color Selection and Architectural Harmony
Selecting the right color palette requires evaluating fixed home elements that will remain unpainted, such as roof shingles, stone foundations, and brick chimneys. A cool gray roof pairs naturally with slate, blue, or crisp white siding, while warm brown shingles complement cream, olive, and earthy tan shades.
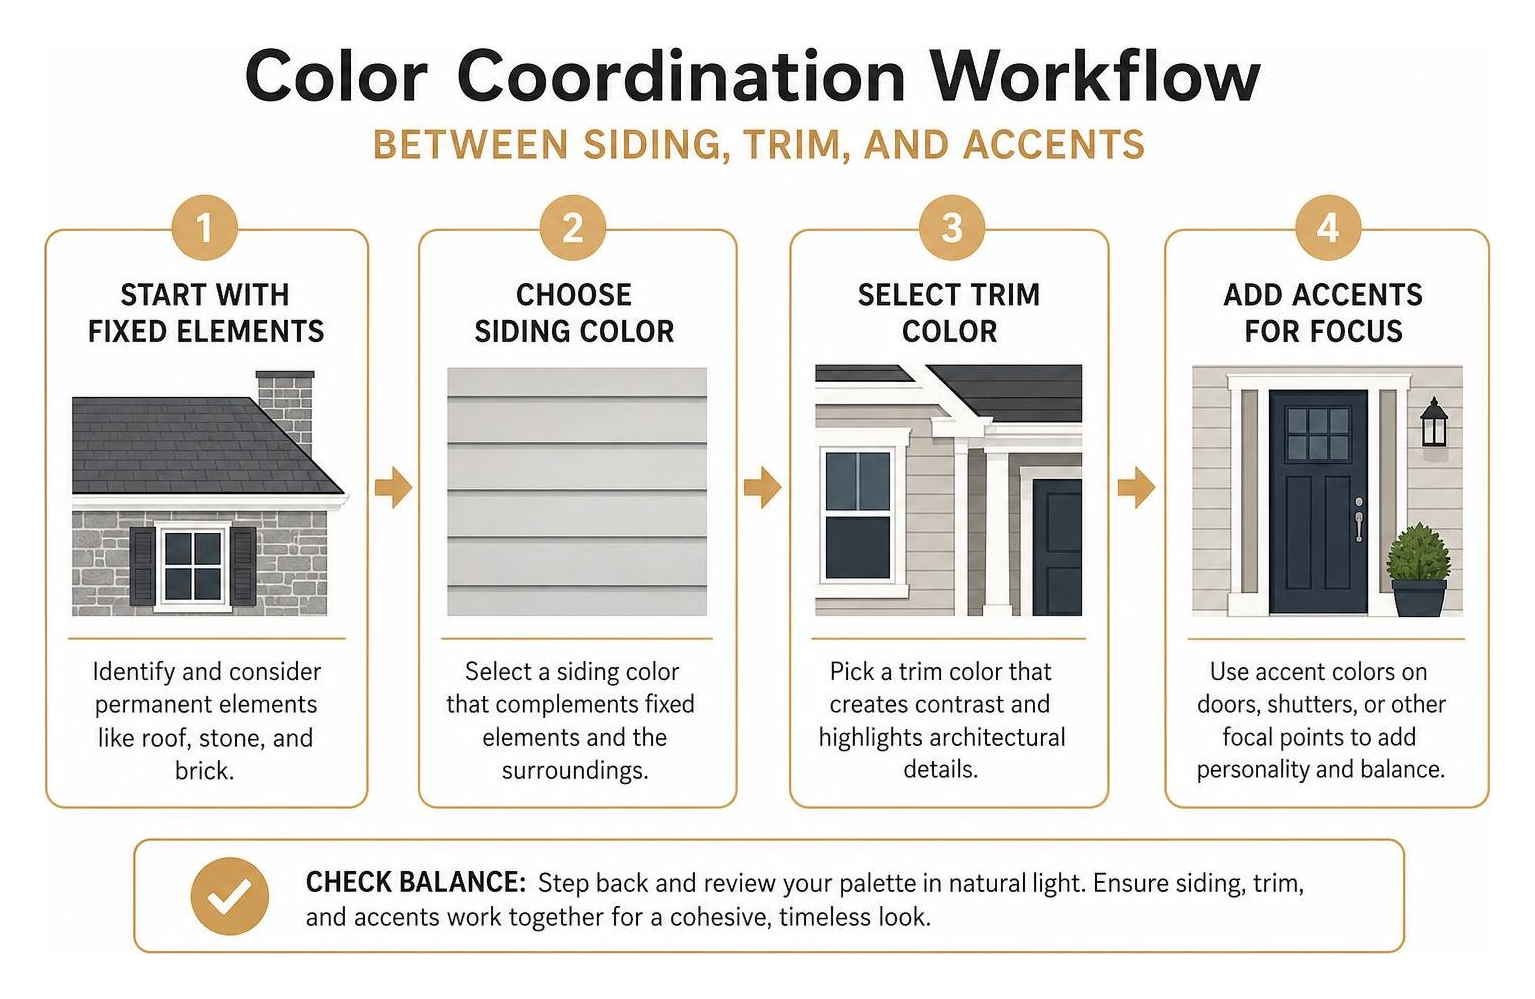
To create depth, use strategic accents on architectural focal points. Explore creative accent ideas for exterior trim and doors to make entryways stand out. A vibrant front door in deep red, sunny yellow, or navy blue adds personality against neutral walls while highlighting entry details.
Exterior vs. Interior Paint Formulations
Never swap exterior and interior coatings. Exterior paints contain specialized flexible acrylic resins engineered to expand and contract across seasonal temperature shifts without cracking. They also incorporate powerful UV inhibitors to fight sun fading and active mildewcides to stop fungal growth in damp conditions.
Inside the home, paint focuses on scrub resistance and low chemical emissions. Because outdoor coatings emit higher volatile organic compounds (VOCs) while curing, review the necessary precautions for using exterior paint indoors before ever opening a can inside. Lab evaluations from major home publications confirm that high-grade outdoor formulations maintain adhesion and resist cracking under years of simulated exposure.
Paint Types and Substrate Compatibility
Different exterior materials require specific paint chemistries for maximum adhesion and weatherproofing.
| Siding Material | Recommended Coating | Key Advantage |
|---|---|---|
| Wood Siding | 100% Acrylic Latex | Breathes with moisture changes and resists cracking |
| Vinyl Siding | Vinyl-Safe Acrylic Latex | Prevents warping by matching solar heat absorption ratings |
| Aluminum Siding | Direct-to-Metal Exterior Acrylic | Bonds tightly to non-porous oxidized metals |
| Brick & Masonry | Breathable Elastomeric or Mineral Silicate | Allows internal moisture vapor to escape freely |
| Stucco | Elastomeric Acrylic Coating | Bridges hairline settling cracks and blocks wind-driven rain |
When working with synthetic siding, check our tips on repainting vinyl siding to avoid dark color choices that can buckle panels in direct sunlight. Metal substrates also benefit from specialized primers; review our guide on painting aluminum siding for proper oxidation removal steps.
For textured walls, specialized stucco painting finishes bridge hairline fractures and seal porous surfaces. Modern products like BEHR DYNASTY Exterior Paint offer 10-year fade protection, low-temperature application down to 35°F, and rain resistance within 60 minutes. Similarly, Dutch Boy Forever Exterior Paint + Primer provides UV-blocking technology and quick 4-hour recoat times.
Step-by-Step Guide to Home Painting Outside

Painting your home requires a methodical approach. Skipping straight to brushing without thorough cleaning and repair leads to early peeling and failed coatings.
Essential Equipment for Home Painting Outside
Having the right tools on hand ensures clean lines and even coverage across large surfaces:
- Airless Paint Sprayer: Applies fast, uniform coatings on broad siding panels and high peaks; see our recommendations on spray painting siding and eaves for setup tips.
- Synthetic Bristle Brushes: Angled 2.5-inch to 4-inch nylon-polyester brushes for detailed trim work and back-brushing.
- Heavy-Duty Extension Ladders & Staging: Sturdy, level ladder setups with standoff stabilizers to protect gutters.
- Canvas Drop Cloths: Heavy fabric to shield landscaping, porches, and concrete walkways from overspray and drips.
- Pressure Washer & Scrapers: Washers operating between 1,500 and 2,500 PSI, paired with carbide-blade scrapers for loose paint removal.
- Pro-Grade Caulking Gun: Smooth-action gun loaded with paintable elastomeric exterior sealant.
Ideal Weather and Timing for Home Painting Outside
Exterior coatings need steady temperatures and low humidity to cure correctly. High-performance paints can cure at lower temperatures, but optimal application occurs between 50°F and 85°F with relative humidity under 70%.
Avoid applying coatings in direct, hot sunlight, which dries the surface layer too quickly and causes brush marks or blistering. Choosing the best time of year to paint your home means targeting dry, mild weeks in late spring, summer, or early fall while steering clear of windy or rainy forecasts.
Surface Preparation and Paint Application Process
Follow this sequence for long-lasting results:
- Power Wash and Sanitize: Wash away accumulated chalking, dirt, and grime. Treat mold and mildew with a specialized exterior cleaner before rinsing thoroughly. Let surfaces dry for at least 24 to 48 hours.
- Scrape and Feather Sand: Remove loose, flaking paint down to a sound edge. Sand bare transitions smooth to blend the ridges.
- Seal Gaps and Joints: Apply paintable elastomeric acrylic caulk around window casings, door frames, and corner joints. Do not caulk the horizontal bottom laps of wood or vinyl siding, as these gaps let trapped moisture escape.
- Prime Bare Areas: Spot-prime exposed wood, rusted metal, and patched masonry. If you are painting over exterior paint that has a glossy finish, scuff-sand the surface first to ensure proper bonding.
- Apply Two Finish Coats: Work from the top of the house down to keep a wet edge. Maintain recommended recoat times—typically 2 to 4 hours for latex formulas—between applications.
Managing Costs, Common Defects, and Long-Term Maintenance
Smart planning keeps your project on budget while preventing early paint failures down the road.
Preventing Blistering, Peeling, and Fading
Most paint failures stem from moisture problems or poor surface preparation rather than bad paint.
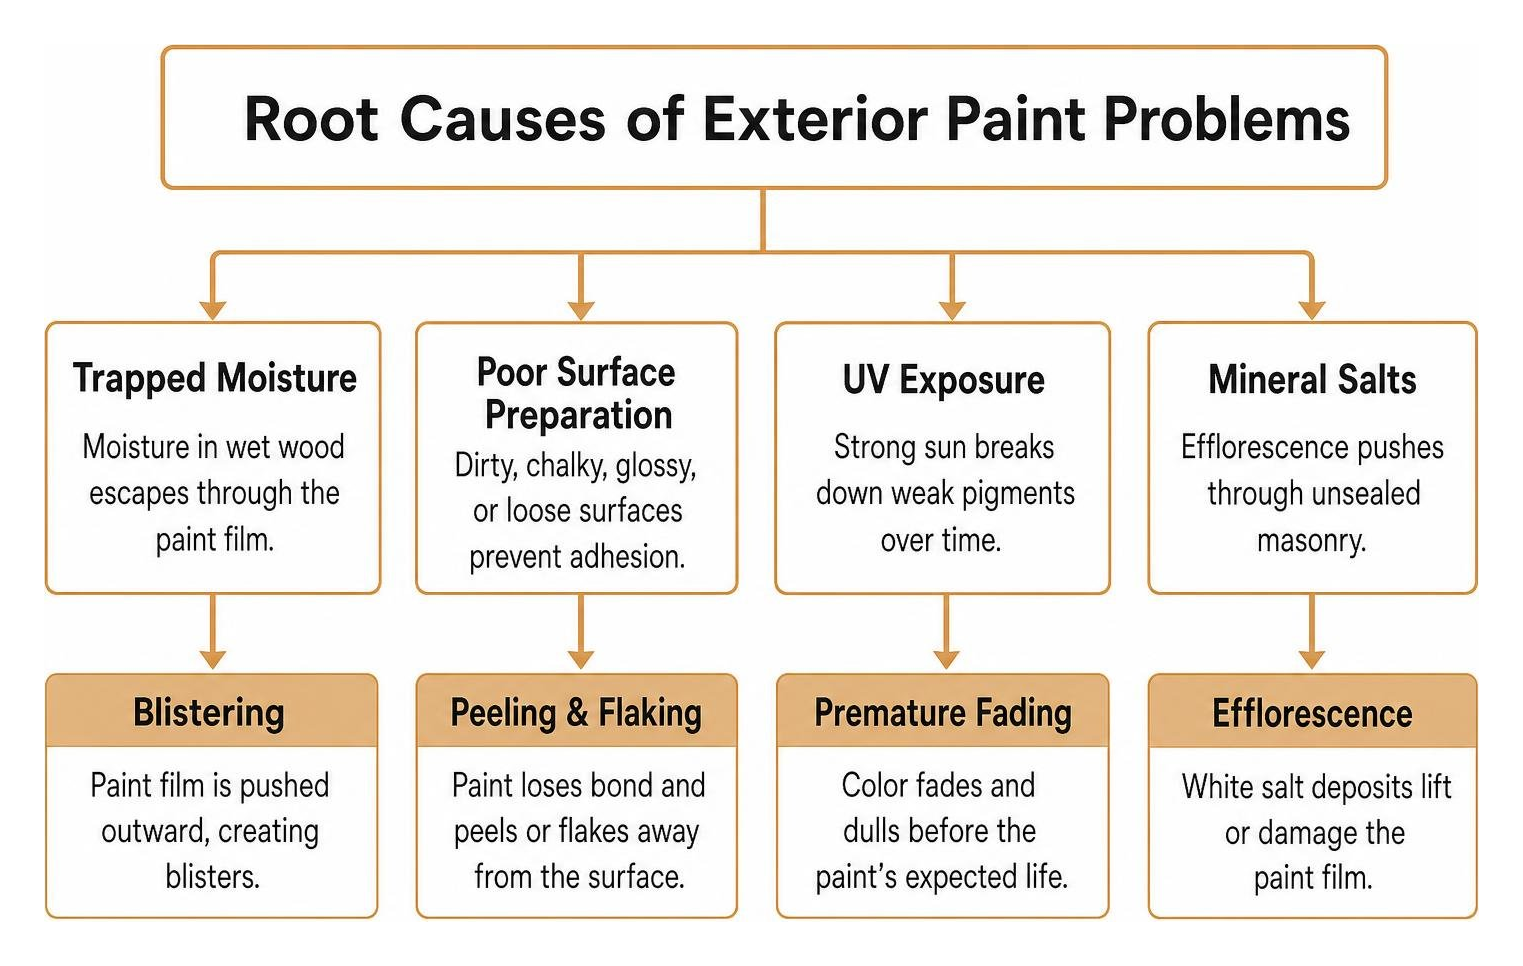
- Blistering: Trapped moisture escaping through wet wood pushes the paint film outward. Prevent this by testing surface moisture levels before painting.
- Peeling and Flaking: Applying fresh paint over dirty, chalky, or glossy surfaces ruins adhesion. Always wash thoroughly and prime bare substrates.
- Premature Fading: Heavy UV exposure breaks down weak pigments. Choose paints formulated with pure acrylic binders and UV-stable colorants.
- Efflorescence: White mineral salt deposits pushing through unsealed brick or masonry can lift coatings. Seal masonry with breathable primers before applying topcoats.
Permits, HOA Regulations, and Hiring vs. DIY
Before purchasing paint, verify any local municipal guidelines and review HOA exterior painting rules and approvals. Many communities require color scheme pre-approval before work begins.
When deciding between DIY and professional painters, factor in ladder safety, equipment rentals, and the physical labor required for large multi-story homes. Review our guide on what to expect when paying professional exterior painters alongside understanding the true cost of home exterior painting to make an informed choice for your home.
Routine Cleaning and Maintenance Schedule
Protect your investment with regular upkeep:
- Annual Rinsing: Gently spray siding each spring using a garden hose or low-pressure nozzle to remove airborne dirt, pollen, and salts.
- Mildew Management: Wash shaded, damp north-facing walls with a mild detergent solution to prevent fungal spores from eating into the paint film.
- Caulk Inspections: Inspect window and door joints annually. Remove and replace cracked, dried sealant promptly to block water intrusion.
- Targeted Touch-Ups: Sand and spot-paint minor chips or scratches before raw wood or metal is exposed to seasonal weathering.
Frequently Asked Questions About Exterior House Painting
How long does exterior paint take to dry and fully cure?
Water-based acrylic latex paints are typically dry to the touch in 30 minutes to 2 hours and ready for a second coat in about 4 hours under mild conditions. Complete chemical curing—where the resin matrix achieves full hardness and weather resistance—takes between 14 and 30 days depending on local temperature, sunlight, and humidity levels.
How often should home exterior siding be repainted?
Most wood and composite siding requires repainting every 7 to 10 years, while aluminum and vinyl siding can often go 10 to 15 years between coats. Stucco and masonry surfaces typically need attention every 8 to 12 years. Homes facing intense sun or severe winter weather may need touch-ups sooner.
Do I need a primer before applying exterior paint?
Yes, spot-priming is essential whenever you have exposed bare wood, repaired stucco, patched masonry, or rusted metal surfaces. High-tannin woods like cedar and redwood require stain-blocking primers to stop natural oils from bleeding through the topcoat. While self-priming paints work well over existing, sound paint layers, bare and weathered substrates always bond better with a dedicated primer.
Conclusion
A well-executed exterior paint project transforms your home’s curb appeal while providing vital protection against moisture, sun damage, and seasonal wear. Taking the time to properly wash, scrape, caulk, and prime ensures your new color scheme stays vibrant for years to come.
If you prefer to leave the heights, prep work, and application to experienced professionals, our team at T&Z Interior And Exterior Painting is ready to help. Founded in 2009 by Tomasz Niemotko, we bring over 15 years of hands-on experience to homeowners throughout Lombard, Elmhurst, Wheaton, Downers Grove, and surrounding Chicagoland communities. As a licensed, insured, and BBB-accredited painting contractor, we back our work with a 2-year warranty on all completed projects.
Contact us today to schedule your consultation for professional exterior painting. Request your free estimate online at tandzpainting.com or call our local team directly at (224) 240-0054.